---
title: "Spotler Connector Manual"
author: "by AutomateValue"
url: "https://books.automatevalue.com/2/spotler-connector"
---
# Preface
In a typical marketing scenario, Dynamics 365 is used to manage the data of the customer and Spotler Mail+ to send (commercial) mailings and/or newsletters to those customers.
The Spotler Connector ensures that, among other things, contact information is synchronized to Spotler.
## About this Manual
This manual explains how this synchronizing is working and explains how to automate processes. Using this you can apply marketing automation in your business.
Where in this manual is spoken about **connector**, we mean the **Spotler Connector**.
When we talk about **Dynamics 365** as the source system, this also applies to **Power Apps**. If certain aspects don't work with **Power Apps**, we will explicitly mention this.
For **Power Apps** you use the light version of our connector: **Spotler Connector for Power Apps**.
## Who this Manual is For
This manual is written for:
- **Marketeers and Salespersons** who want to know how the basic sync works and how to do basic actions.
- **IT and System Administrators** interested in the background details of the synchronization.
- **Partners and Implementors** who want to know how to use the connector when customizing or automate processes.
While some concepts may be complex, we tried to make the content accessible to readers with varying levels of experience. The early sections are more focused on beginners, while the later sections are for experts.
## Reading the Manual
This manual is only available on the web and can't be downloaded.
Clear typography that adapts to your device and screen size, a calm layout, and minimal distractions should make reading this Manual online a pleasure.
Images in this manual can be clicked on the get a larger view.
Here are a few more things you should know.
### Full Screen
For a more immersive, focused reading experience hit the expand button at the top of the screen to enter Full Screen mode (on supported devices). Full Screen hides most of the clutter and busyness of your browser and operating system so you can focus on reading.
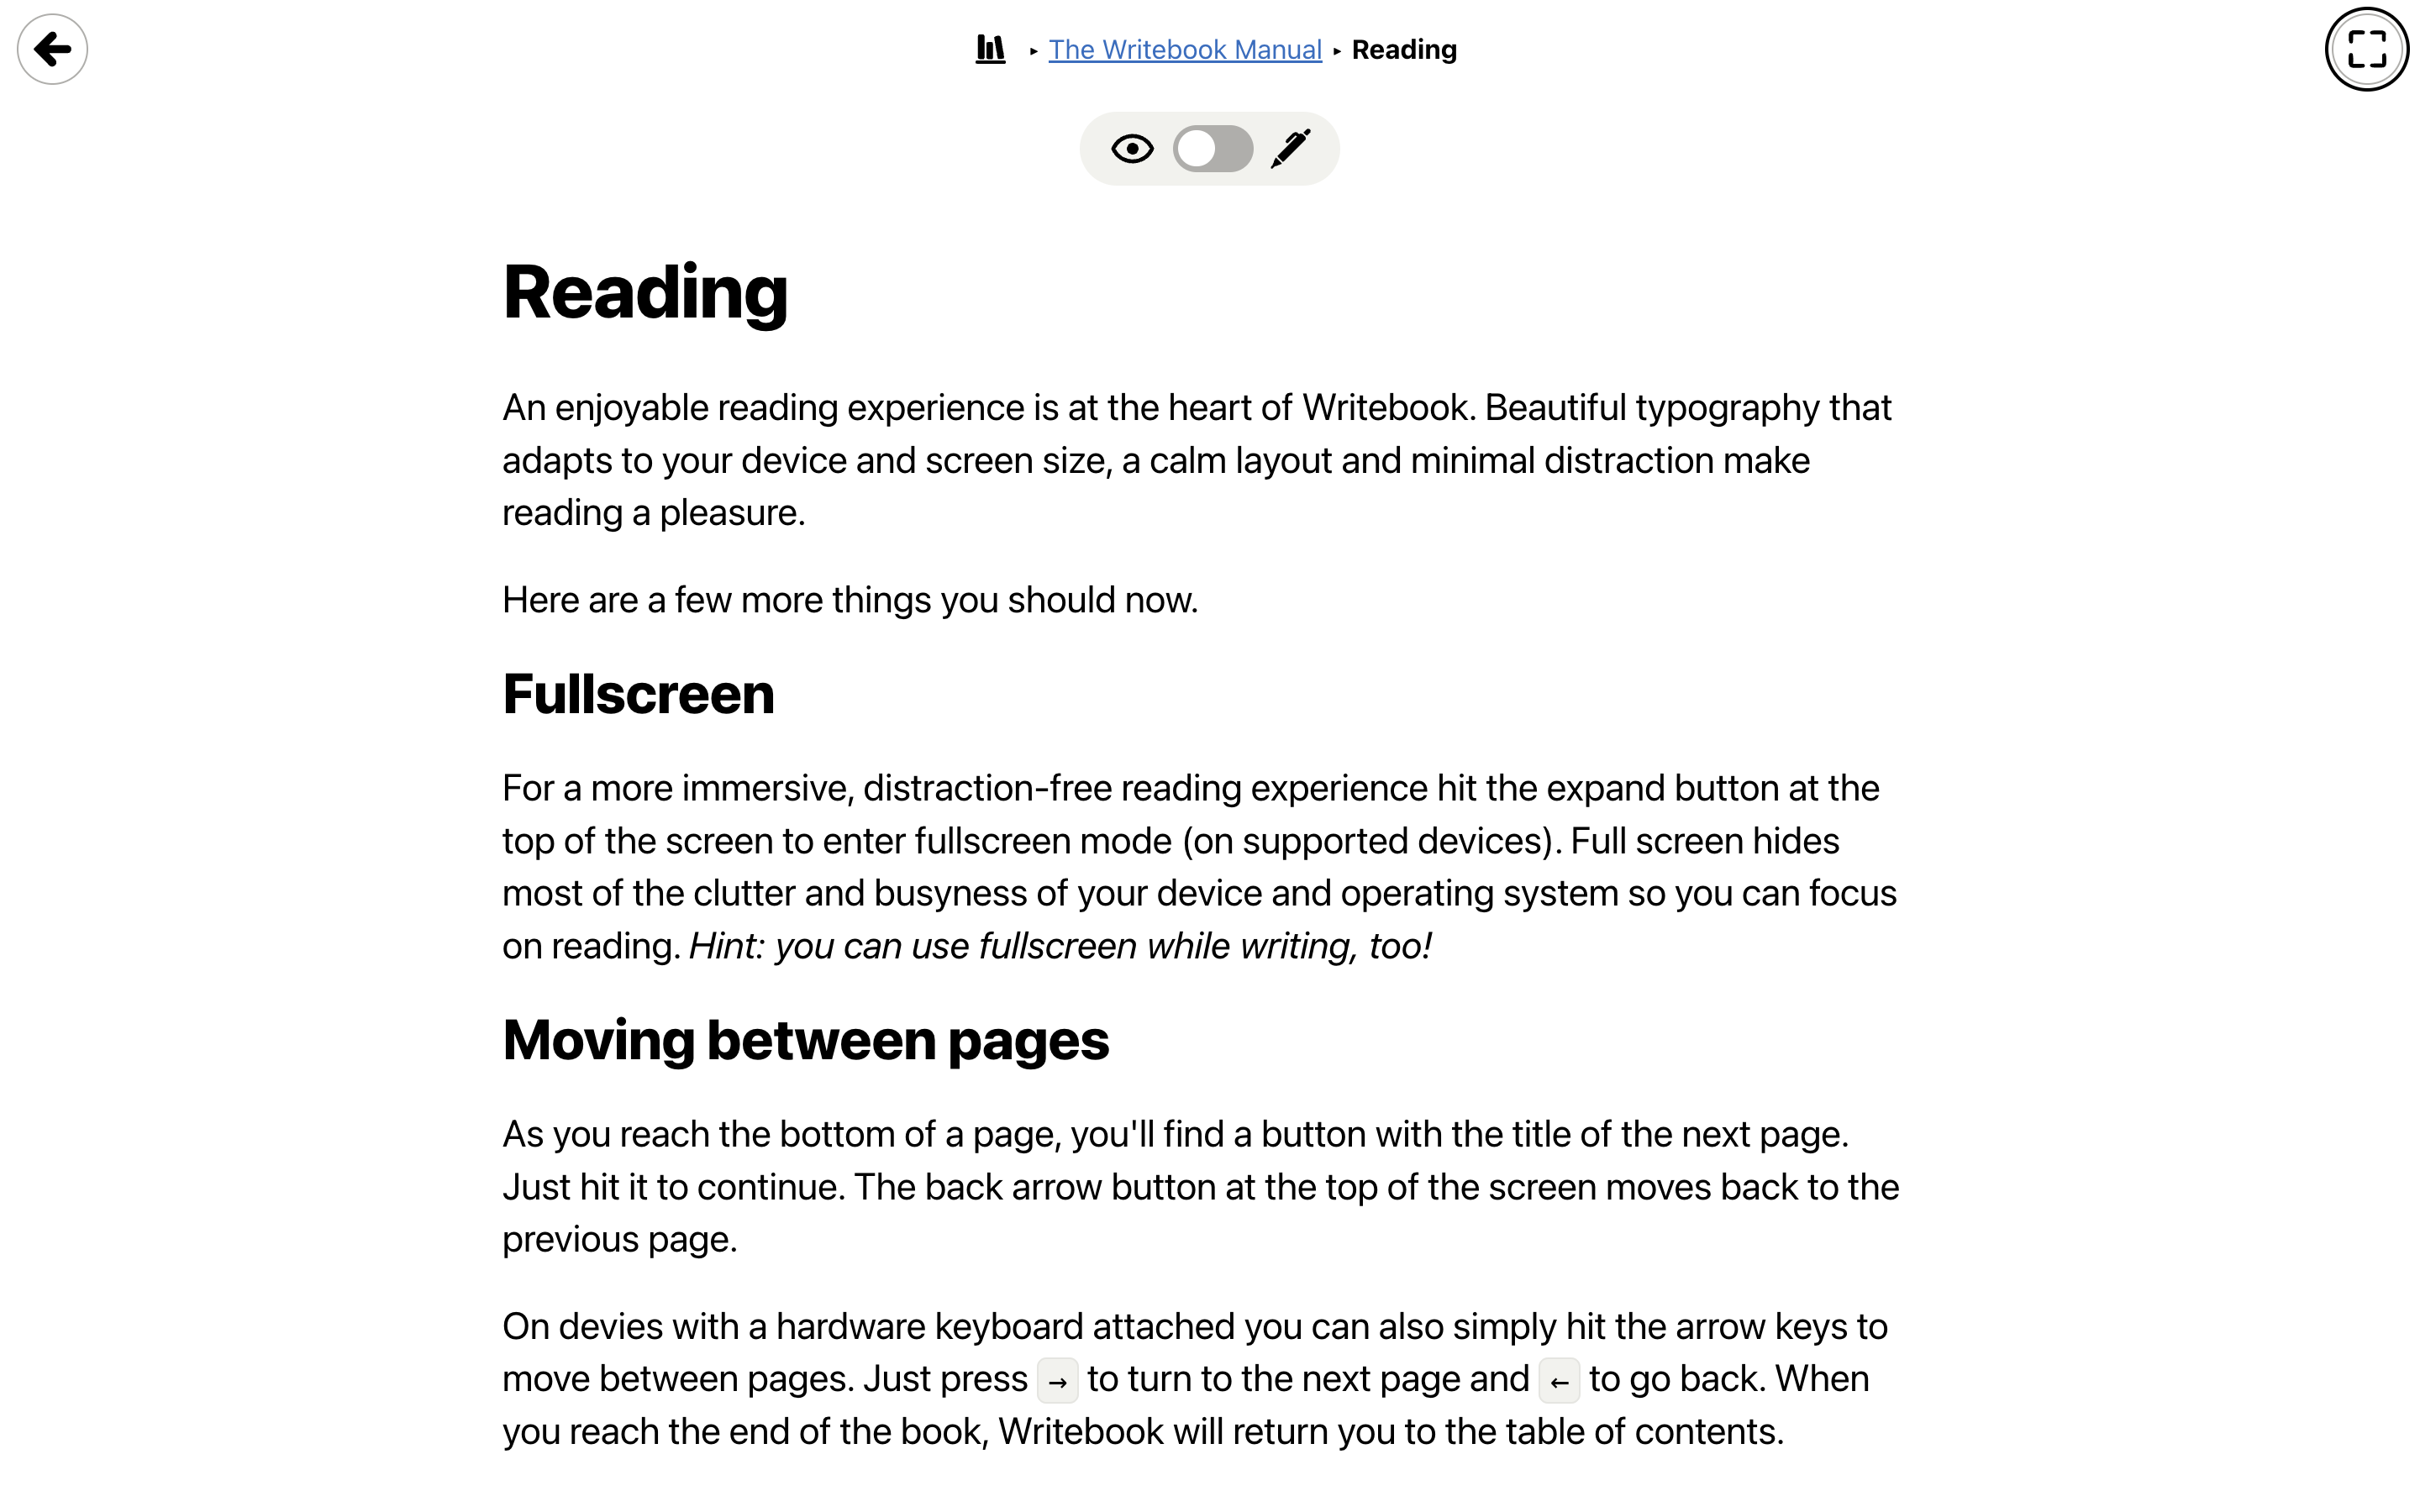 ### Moving between pages
As you reach the bottom of a page, you'll find a button with the title of the next page. Just hit it to continue. The back arrow button at the top of the screen moves back to the previous page.
On devices with a hardware keyboard attached you can also simply hit the arrow keys to move between pages. Just press `→` to turn to the next page and `←` to go back. When you reach the end of the book, the Manual will return you to the table of contents.
## Feedback
This manual is a work-in-progress and will be improved and extended in time. If you have any feedback to improve this manual, please let us know at support@automatevalue.com.
# Spotler Hub App
Spotler related info and actions will be added to your own Dynamics 365 app by the Spotler Connector solution.
The Spotler Connector solution also adds the Spotler Hub app. This app can be handy for marketeers and/or IT staff to navigate easier to Spotler related info and actions.
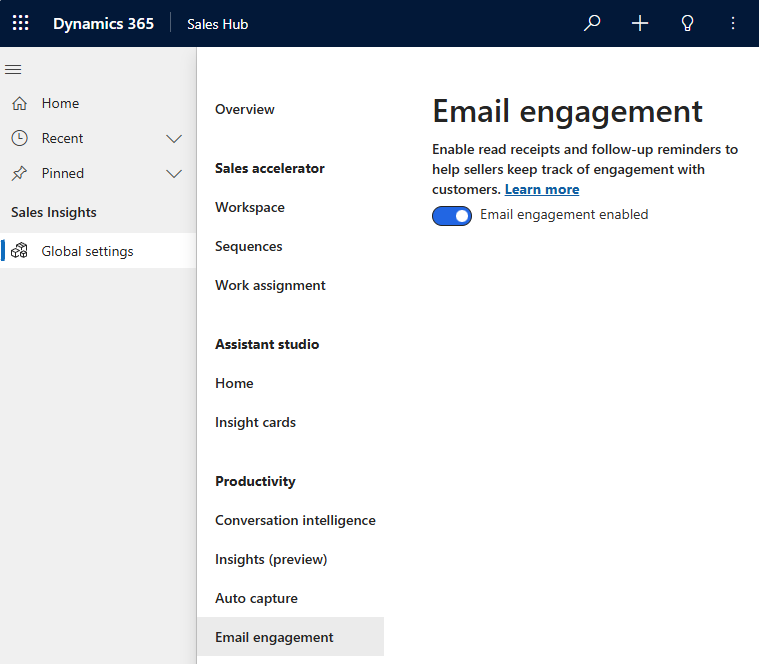
> ⚠️**Warning!** The have access to the Spotler Hub app you need to have the **Spotler User** role.
---
## Open Spotler Hub
You can open the Spotler Hub App when you have logged into Dynamics 365.
1. Using the app switch app button in the upper left when you have your Dynamics 365 open. 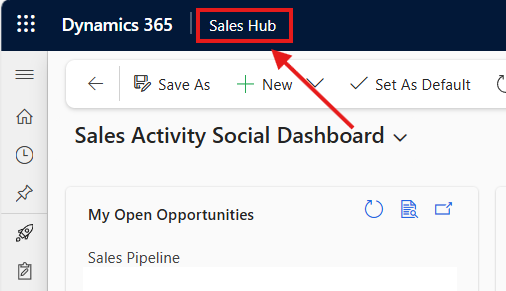
### Moving between pages
As you reach the bottom of a page, you'll find a button with the title of the next page. Just hit it to continue. The back arrow button at the top of the screen moves back to the previous page.
On devices with a hardware keyboard attached you can also simply hit the arrow keys to move between pages. Just press `→` to turn to the next page and `←` to go back. When you reach the end of the book, the Manual will return you to the table of contents.
## Feedback
This manual is a work-in-progress and will be improved and extended in time. If you have any feedback to improve this manual, please let us know at support@automatevalue.com.
# Spotler Hub App
Spotler related info and actions will be added to your own Dynamics 365 app by the Spotler Connector solution.
The Spotler Connector solution also adds the Spotler Hub app. This app can be handy for marketeers and/or IT staff to navigate easier to Spotler related info and actions.
> ⚠️**Warning!** The have access to the Spotler Hub app you need to have the **Spotler User** role.
---
## Open Spotler Hub
You can open the Spotler Hub App when you have logged into Dynamics 365.
1. Using the app switch app button in the upper left when you have your Dynamics 365 open. 
2. Click the Spotler Hub app button to open it. 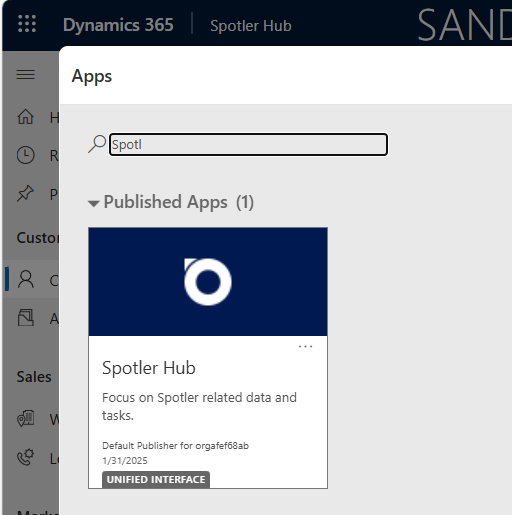
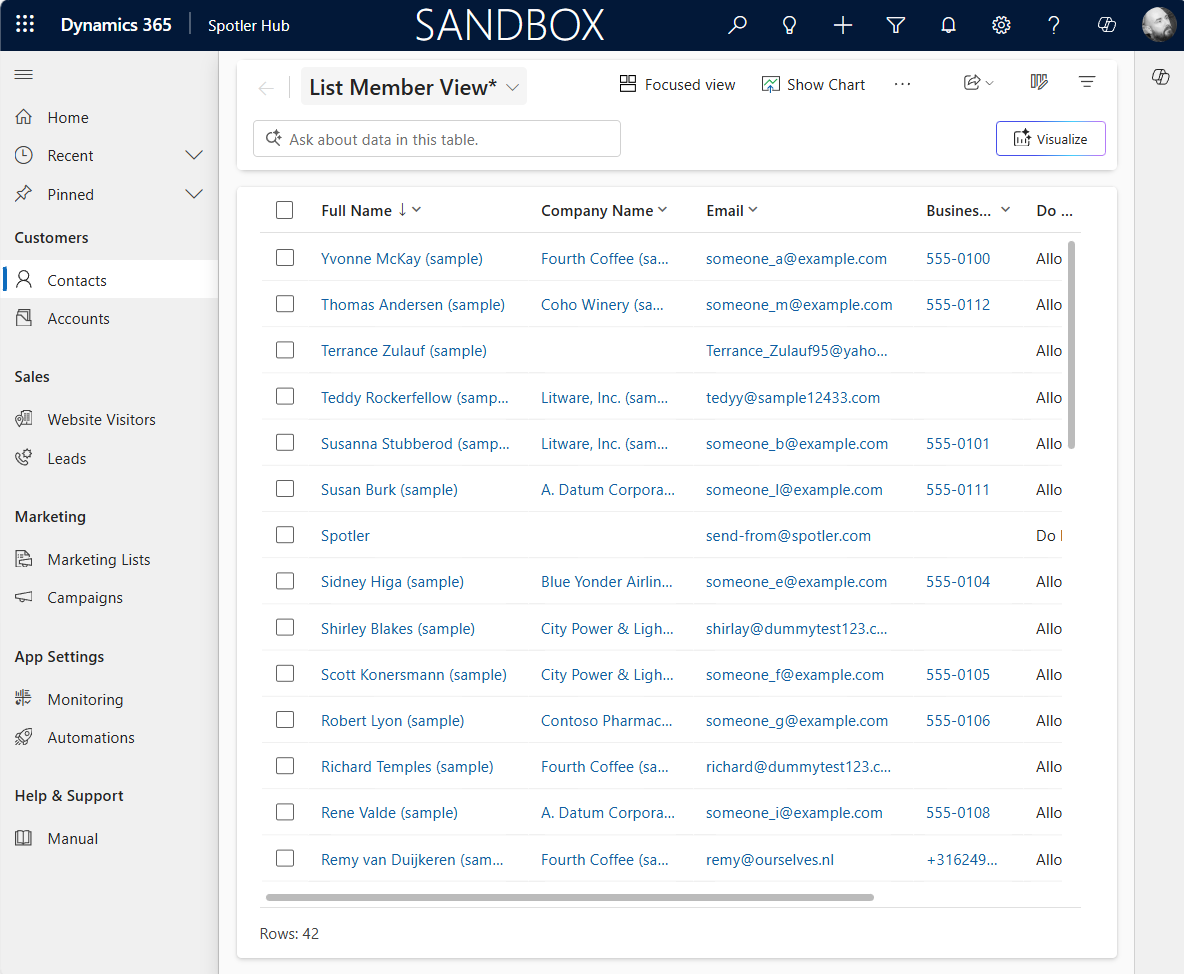
## Spotler Hub App
When the Spotler Hub app is open you use the left navigation menu to go to the different sections.
# Synchronize Contacts
Keeping your contacts up to date shouldn’t require manual exports or imports. That’s exactly what the Spotler Connector fixes — it keeps contact data in **Dynamics 365** and **Spotler** synchronized automatically.
The Spotler Connector keeps your contact lists in sync between Dynamics 365 and Spotler. So when a customer updates their info in your CRM, it’s reflected in Spotler — and vice versa if you choose.
That means:
- No more CSV exports
- No more outdated email lists
- Always the right data for your marketing campaigns
The connector supports these record types in Dynamics 365:
1. **Contact** (🇳🇱 Contactpersoon)
2. **Lead** (🇳🇱 Potentiele Klant)
3. **Account**

- [🔄 How Synchronization Works](#how-synchronization-works)
- [➡️ Syncing from Dynamics 365 to Spotler](#syncing-from-dynamics-365-to-spotler)
- [⬅️ Syncing from Spotler to Dynamics 365](#syncing-from-spotler-to-dynamics-365)
- [⚙️ Field Mapping](#field-mapping)
---
## 🔄 How Synchronization Works
The Spotler Connector supports both **one-way** and **two-way** synchronization.
| Direction | Description |
|-----------|--------------|
| ➡️ **Dynamics → Spotler** | Default setup. Keeps Spotler updated with the latest CRM data. |
| ⬅️ **Spotler → Dynamics** | Optional. Use when contacts can update their info via Spotler forms. |
| 🔁 **Two-way Sync** | Keeps both systems aligned automatically. Useful when both systems can change data. |
By default:
- Contact info syncs **from Dynamics 365 to Spotler** (➡️ one-way).
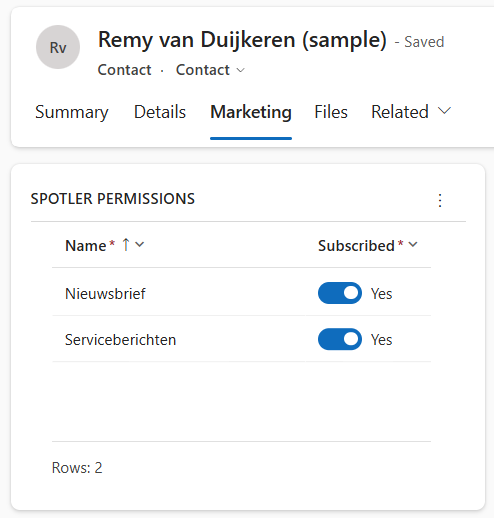
- [Subscriptions (Permissions)](../32/sync-subscriptions) sync **both ways** (🔁).
If you have a profile update form in Spotler where customers change their name or email — enabling two-way sync ensures those updates flow back into Dynamics 365 too.
---
## ➡️ Syncing from Dynamics 365 to Spotler
The Spotler Connector automatically synchronizes new or updated **Contacts**, **Leads**, and **Accounts** from Dynamics 365 to Spotler.
As soon as a record is saved, the connector detects the change and starts synchronization — typically completing within seconds.
### 🕒 When Synchronization Runs
Synchronization is triggered automatically when:
- A record is **created**
- Contact details are **edited and saved**
- **Do Not Email** or **Do Not Bulk Email** is changed
- **Subscriptions (Permissions)** are changed
- The record’s status is **activated or deactivated**
- The record is **deleted** in Dynamics 365
If **Do Not Email** is set to `true` _or_ a contact is **deactivated** _or_ **deleted**, the connector **anonymizes** the record in Spotler. Contacts cannot be deleted in Spotler, but anonymization ensures that all personal data is removed.
>💡Tip: Anonymizing when a contact is deactivated can be turned off. Support (support@automatevalue.com) can adjust this for you.
To change when the synchronization is run in Dynamics 365, see the more advanced section [Configure Contact Sync](../40/configure-contact-sync)
### ⚙️ What the Connector Checks
Before syncing, the connector validates that each record meets the required conditions:
- The record is **active**
- A **valid email address** is available
- Spotler Status is **not Opt-Out**
- The record is **not excluded** by any mapping filters
When those conditions are met:
- New records in Dynamics 365 are **created as new contacts** in Spotler
- Updates to existing records automatically **refresh the contact’s information** in Spotler
### ⏱️ Timing and Verification
Synchronization timing can vary slightly depending on network speed and overall system load, but updates typically appear in Spotler shortly after saving.
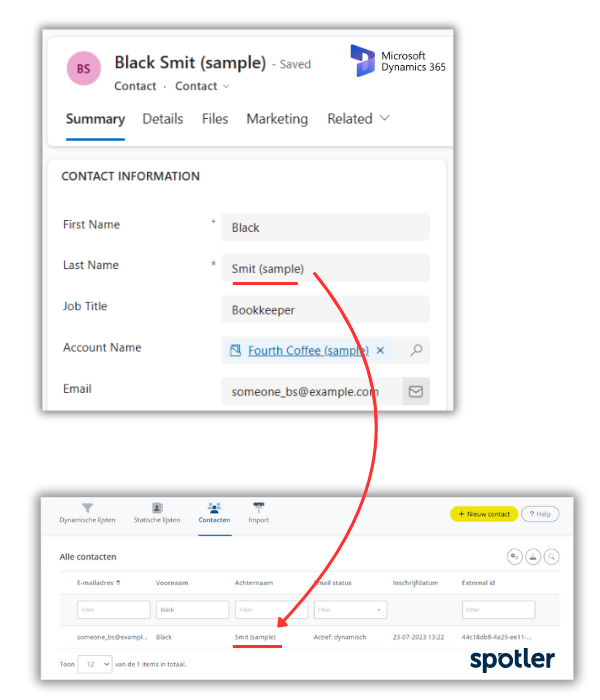
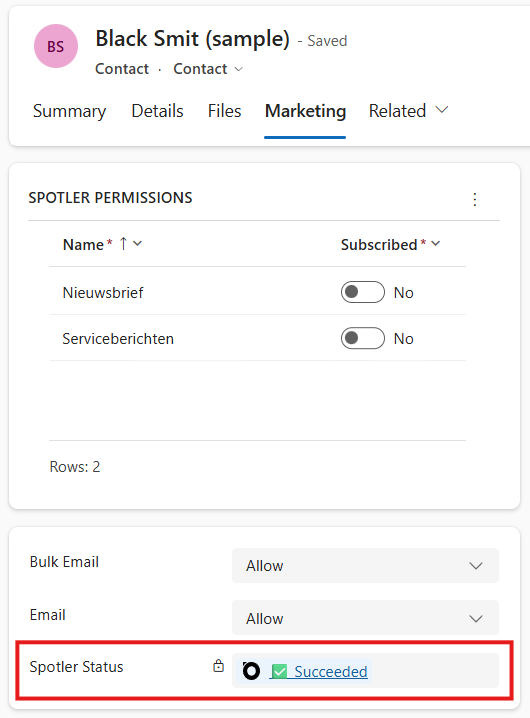
To verify that synchronization worked correctly, [check **Contacts** in Spotler](https://mailplus.spotler.help/hc/en-us/articles/360008483473-Contacts). The synced name, email, and mapped fields should match your Dynamics 365 record.
If a record doesn’t appear in Spotler, it likely didn’t meet one of the sync conditions — check the contact’s **Spotler Status**, which is often found on the **Marketing tab**. You can click the status for more details.
### 🔁 Duplicate prevention in Spotler
When contacts are synchronized from Dynamics 365, Spotler automatically applies its **duplicate prevention rules**. These rules ensure that the same contact will not be created twice.
Duplicate prevention in Spotler works by comparing both the **externalId** and the **email address** of incoming data. If a contact already exists with the same email address, Spotler will **merge the new data** with the existing record instead of creating a duplicate. This prevents multiple records for the same person and ensures that each contact receives only one newsletter or campaign message.
This means that you can safely synchronize contacts from Dynamics 365 without worrying about duplicates being created in Spotler.
>💡Tip: It is not advised, but there is an option to add one or more fields to the **duplication-prevention rules**. Contact Spotler to adjust this.
---
## ⬅️ Syncing from Spotler to Dynamics 365
The Spotler Connector doesn’t just send data one way — it can also synchronize changes **from Spotler back to Dynamics 365**. This ensures that any updates made in Spotler (for example, through profile forms or automation actions) are reflected in your CRM.
Under normal conditions, the connector checks for changes in Spotler **every 15 minutes**. When updates are found, it evaluates the field mapping to determine which fields are set to:
- ⬅️ Sync from Spotler to Dynamics 365 (one-way)
- 🔁 Sync in both directions (two-way)
If a field is configured in either of these directions, the corresponding values in Dynamics 365 will be updated automatically. This applies even if the Spotler update originated from a previous sync from Dynamics 365 — ensuring both systems always remain consistent.
By default, **Subscriptions (Permissions)** are already configured for **two-way synchronization**, so any changes to a contact’s email permissions in Spotler are automatically reflected in Dynamics 365.
---
## ⚙️ Field Mapping
The Spotler Connector uses a **field mapping** to define which data is synchronized between Dynamics 365 and Spotler.
Each field in this mapping can have its **own synchronization direction** — so you can choose what makes sense for each specific field.
For example, you might:
- Sync **First Name** and **Email** only from Dynamics to Spotler (➡️)
- Sync **Permission Status** both ways (🔁)
- Sync **Profile Updates** like phone number back from Spotler (⬅️)
You can configure the direction per field:
- ➡️ Sync only to Spotler
- ⬅️ Sync only to Dynamics 365
- 🔁 Two-way sync
This flexibility lets you fine-tune synchronization to fit your data flow and business logic. Most [data types](../37/mapping#datatype-conversions) are supported in both directions. If you need help customizing the field mapping, contact our Support (support@automatevalue.com) — we can adjust it for your setup.
By default, a simple initial mapping is included to get you started. It synchronizes basic contact information such as **name**, **email**, **job title**, **birthdate**, and **address** from Dynamics 365 to Spotler. This ensures your main contact details are immediately usable for campaigns, without needing any manual setup.
### 🧹 Purging existing properties
There is an advanced option to **Purge Existing Properties When Not Set (PurgeExistingPropertiesWhenNotSet)**.
When enabled (`true`), any existing fields in Spotler that are *not* included in the update from Dynamics 365 will be **cleared (purged)**.
This ensures that outdated or removed data is not kept in Spotler. This option is useful when you want Spotler to always reflect exactly what’s in Dynamics 365 — and not retain values that no longer exist in CRM.
By default, this setting is `false`, meaning existing values in Spotler remain unchanged if they are not explicitly updated. This is especially important if CRM is not the only source of information.
If you need help enabling or understanding this setting, contact Support (support@automatevalue.com) for guidance.
# Synchronize Subscriptions
_✍️ DRAFT : IN PROGRESS_
- Sync with Permission table or Marketing List
- Do Not Bulk Email => Sets all Permissions to False
- Do Not Email => Anonymize Contact
- Unsubscribes / Opt-outs
## iFunds Engage 365
The Connector is optimized for the [iFunds Engage 365](https://ifunds.nl/oplossingen/engage-365-members/) solution.
**Periodieken** is the way in _Engage 365_ to describe subscriptions (opt-in/opt-out). These **Periodieken** synchronized to **Permissions** in Spotler.
## Advanced
There are two [environment variables](../52/environment-variables) that control what happens for Permissions when a new Contact, Lead or Account is being created.
# New Subscribers
New subscribers in Spotler can be added to Dynamics 365 as Contact or Lead (or Membership Entry for [iFunds Engage 365](../42/ifunds-engage-365)).
For example, if you have a subscription form in Spotler, where new leads can leave their info, like their name and email address.
The connector makes it possible to add these new subscribers into Dynamics 365!
You specify if you want to **create a Lead or Contact** in Dynamics 365. Each has their own default strategy to add it to Dynamics 365:
- **Lead**: Each new contact in Spotler, creates a new record, even if the same email address is used.
- **Contact**: If a record with the same email address already exists, it’s updated. No duplicate contact is created if the same email address is used.

>💡Tip: You can also have a custom strategy, like other columns for deduplication!
Do you use a Source column to specify the marketing channel? By specifying a standard value in the mapping for that column, the connector can auto populate it with the standard value.
## How to enable it?
We can enable this by changing to mapping for you.
Contact us to specify which columns you want to allow for bi-directional sync and if you want to auto-create new Contacts or Leads in Dynamics 365.
> ⚠️**Warning!** An updated Contact in Spotler where the 'External Id' is empty or not a GUID (globally unique identifier) will also be treated as New Subscriber!
## iFunds Engage 365
The Connector is optimized for the [iFunds Engage 365](https://ifunds.nl/oplossingen/members) solution.
New subscribers can be created as a **Membership Entry** in Engage 365. When a new Membership Entry is created it follows the normal flow configured in Engage 365.
# Synchronize Marketing Lists
In Dynamics 365, you usually have way more data than in your Spotler account. This is partly because Dynamics 365 already stores a lot of data on its own, and partly because it acts as a hub, pulling in data from other connected systems. This extra data lets you create more detailed segmentations in Dynamics 365.
You don’t need to sync all this data into Spotler to send relevant marketing messages.
You can create a **Marketing List**, where you select members using filters on your data in Dynamics 365. For example _your top 100 customers based on sales in the last 6 months_ or _all customer who did a purchase in the last month_.
> ⚠️**Warning!** Marketing Lists are only available when you have a Dynamics 365 Sales license. Power App license doesn't contain Marketing Lists! See [Add/Remove from List](../45/sync-audiences) for an alternative way of syncing.
Using the connector, you can synchronize this **Marketing List** to Spotler as an [**Dynamic List**](https://helpcenter.spotler.nl/hc/en-us/articles/360008483433-Dynamic-Lists), without syncing all the related data.
You can then access these [Lists](https://helpcenter.spotler.nl/hc/en-us/articles/360008341214-Introduction-Lists) in Spotler and use them for email marketing right away.
> ⚠️**Warning!** This feature is only available in Spotler Mail+ Automation and eCommerce, not for Spotler Mail+ Professional.
- [Dynamics vs Static Lists](#dynamics-vs-static-lists)
- [New Marketing List](#new-marketing-list)
- [Sync Marketing List](#sync-marketing-list)
- [Update Marketing List](#update-marketing-list)
- [Remove List in Spotler](#remove-list-in-spotler)
- [Advanced](#advanced)
---
## Dynamics vs Static Lists
One thing to keep in mind when syncing lists is that both Dynamics 365 and Spotler have a concept of dynamic and static lists, they are the same in some ways and different in other ways!
- Marketing List In Dynamics 365:
- **Static list** is a list where you can add and remove members manually.
- **Dynamic list** is a list that returns members dynamically when needed, based on filter criteria you set. For example, if you want to return members in a specific city. A dynamic marketing list retrieves the updated list of members each time you open the list. The benefit of a dynamic list in Dynamics 365 is that you can base your criteria on all the data in Dynamics 365 without the need to sync that data to Spotler.
- [List In Spotler](https://mailplus.spotler.help/hc/en-us/articles/360000618054-What-is-the-difference-between-a-dynamic-and-a-static-list):
- **Static list** is a list where you can add and remove contacts manually. Often used when [importing contacts manually in Spotler](https://helpcenter.spotler.nl/hc/en-us/articles/360008341354-Import), not using the Spotler Connector.
- **Dynamic list** is a list that is automatically updated based on filter criteria on a contact in Spotler. For example, a dynamic list can be created to include all contacts in a specific city. Keep in mind that these criteria can only be based on contact data that is in Spotler. When you use Permissions, you use a Dynamic List to filter these contacts.
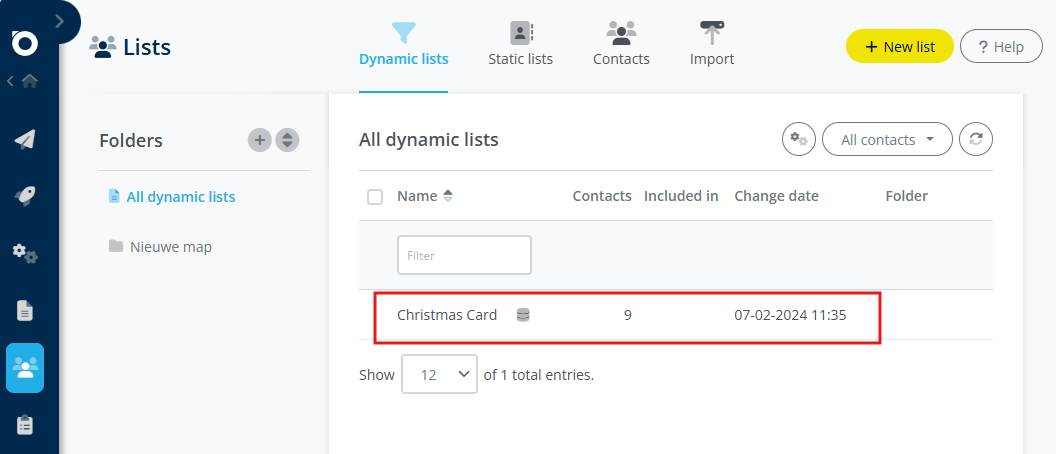
Both dynamic and static Marketing Lists in Dynamics 365 are synced to a Dynamic Lists in Spotler. For a dynamic Marketing List, the connector will retrieve the updated list of members each time you synchronize the list (= snapshot).
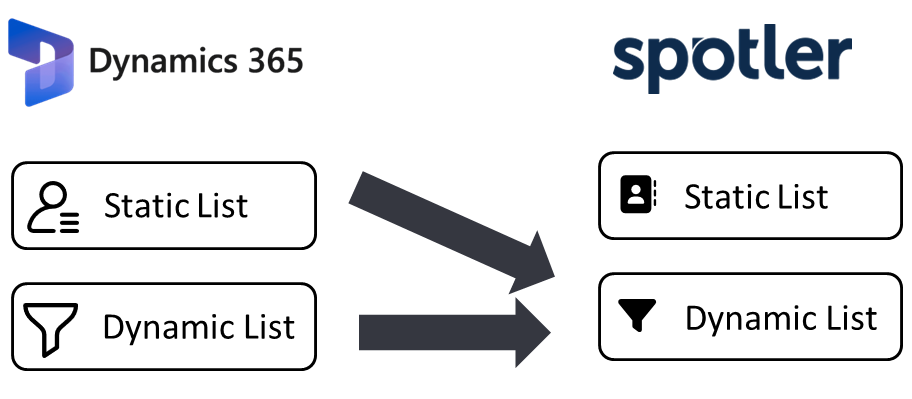
Once synchronized it will appear as a read-only **Dynamic List** in Spotler, where it can be recognized by the database icon (🛢) behind its name. This is also called an **Audience**.

---
## New Marketing List
To create a Marketing List in Dynamics 365, see the following link: [Create Marketing List](https://learn.microsoft.com/en-us/dynamics365/sales/create-marketing-list-using-app-marketing-sales#create-a-marketing-list)
Decide if you want a Dynamic or a Static as **List Type**, because you can't change it after the Marketing List is created.
The same applies for the field **Targeted At**. A Marketing List can only target one type of records at a time, so **Account, Contact or Lead**.
Make sure that the target you select, has been configured and mapped to be synced by the Spotler Connector.
---
## Sync Marketing List
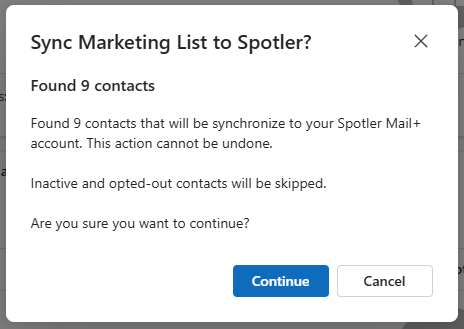
Once you have created a **Marketing List** with members, you can start synchronizing it to Spotler. You press the button **Sync To Spotler** in the top command bar.
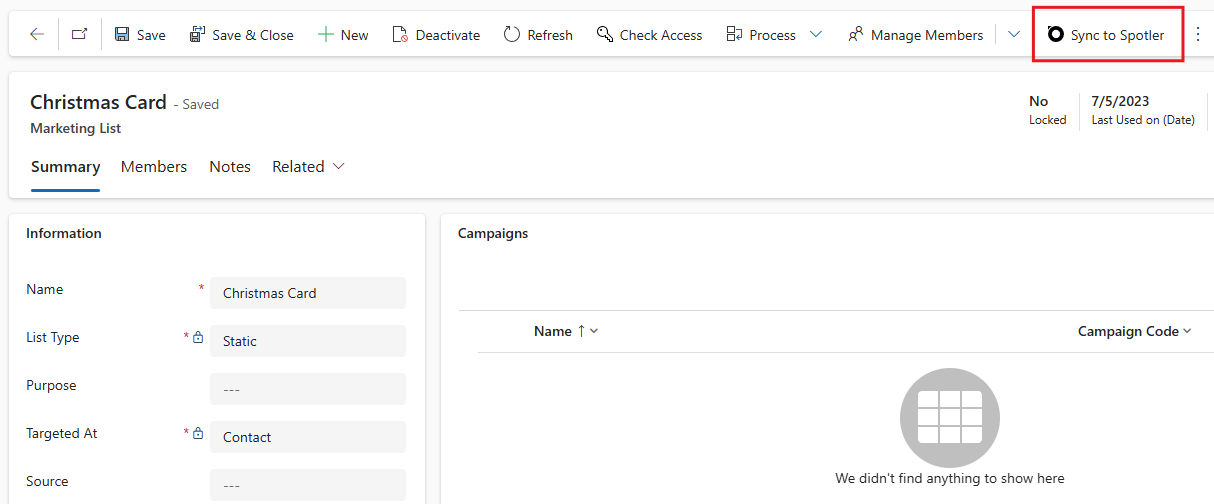
A confirmation dialog will pop up to tell you how many members will be synced.
If a Contact doesn't exist yet in Spotler, it will be synchronized first, before adding it to the List.
Once it has been synced, the field **Spotler Status** on the Marketing List will say **Succeeded** (press **Refresh** in the top command bar).
In Spotler, under **Lists > Dynamic List** the just synced list should be visible.
---
## Update Marketing List
If you change an already synchronized Marketing List in Dynamics 365 you should sync the list again.
For example, when you change the **Name** or added/removed members on a static list, you must sync the Marketing List again by pressing the **Sync To Spotler** button in the top command bar.
To get the latest _'snapshot'_ of a dynamic list in Spotler, you should also sync it again.
>💡Tip: The **Sync To Spotler** button creates a _[Spotler Job](../25/spotler-jobs)_ with the operation **Sync List** and the specified Marketing List. You could schedule this weekly or daily with Power Automate, so that your List is always up to date in Spotler.
### Add 1 member to a Static Marketing List
There is one exception to this rule. The connector _will_ detect when you add one member to a Static Marketing List that is already synced to Spotler.
For example, when you use the **Add to Marketing List** button on the Contact form.
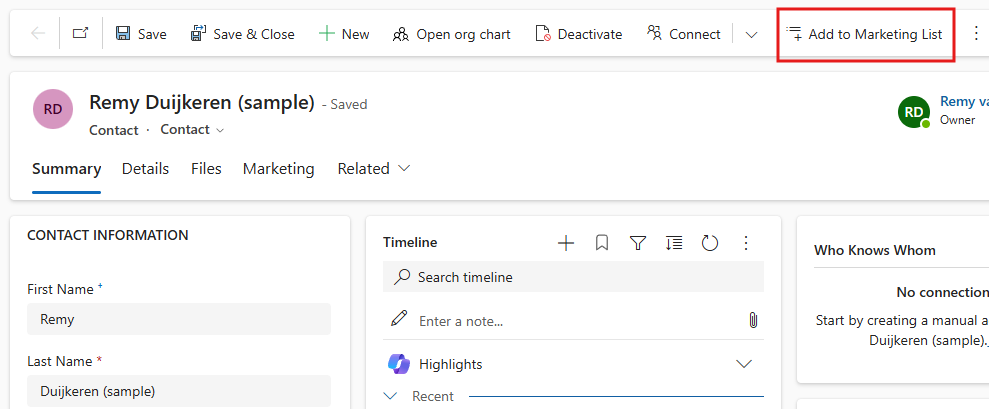
This will cause the contact to be immediately synced to the List in Spotler. No need to sync the Marketing List for adding 1 new member 🙂!
---
## Remove List in Spotler
The connector will detect when you **Delete** or **Deactivate** the Marketing List in Dynamics 365. It will automatically remove the synchronized List from Spotler for you.
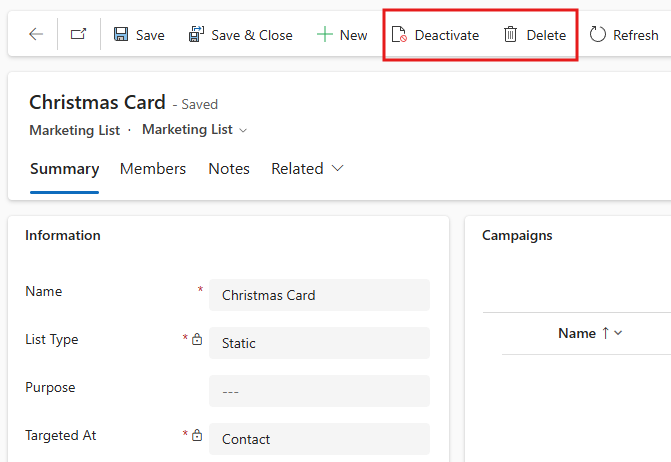
> ℹ️ Info: If **Delete** or **Deactivate** is not visible, then you don't have the permissions to do this action. Ask your Dynamics 365 Administrator for help.
A deactivated Marketing List can be activated again. Once activated, press the **Sync To Spotler** button in the top command bar to re-create the List in Spotler.
Optionally you can also remove the synced List directly in Spotler. You go to **List > Dynamic Lists**, press the drop-down menu at the end of the row, select **Delete** from the menu.
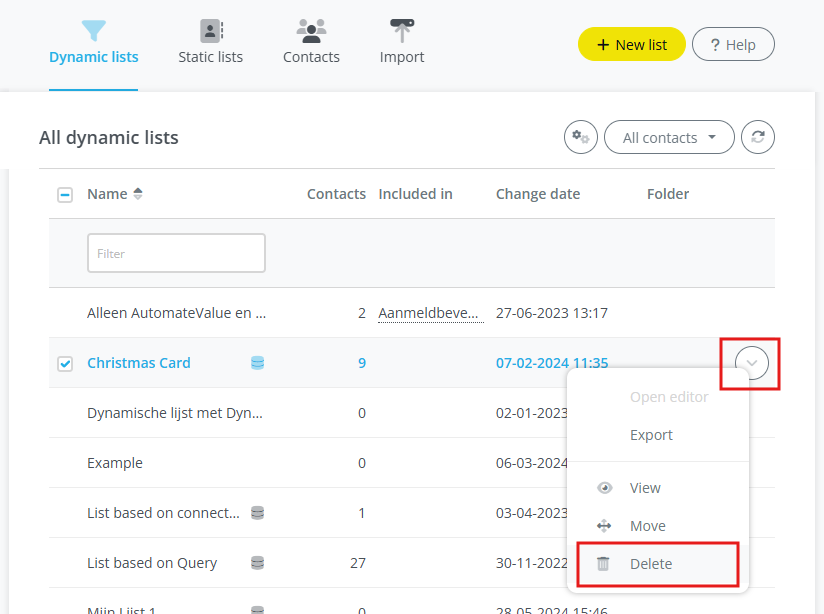
> ℹ️ Info: If **Delete** is grayed out, then you don't have the permissions to do this action. Ask your Spotler Administrator for help.
---
## Advanced
When the Spotler Connector synchronizes a Marketing List, it will check two hidden fields on the Marketing List:
1. **Exclude Members Who Opt Out (DoNotSendOnOptOut)**
Select whether to override the Opt-Out (Do Not Bulk Email) settings on leads, contacts, and accounts when synchronizing to Spotler. If No is selected, those who have chosen to opt out won't be skipped from the List when syncing to Spotler.
2. **Ignore Inactive List Members (IgnoreInactiveListMembers)**
Select whether inactive accounts, contacts, or leads should be skipped from the List when synchronizing to Spotler.
By default, these fields are both set to **True**. It will also show this on the confirmation dialog when you start a synchronization (_Inactive and opted-out contacts will be skipped_).
You can make these fields visible on the form and set them to **False** (but this is not advised).
# Anonymizing / GDPR
_✍️ DRAFT : IN PROGRESS_
- Contact is Deleted
- Contact is Inactive (Deactivated) => has setting
- Contact has no email or
- Contact has NotEmail=true
- Explicit Spotler Job
# Anonymizing / GDPR
## Overview
Anonymizing a contact removes all personally identifiable data from Spotler — name, email address,
and any other stored profile fields. Once anonymized, the contact can no longer be found or
contacted through Spotler. The Spotler Connector handles this automatically in several situations,
and also supports triggering it explicitly through a Spotler Job.
> **Note:** Anonymization is irreversible. The contact record in Dynamics 365 is not affected —
> only the data stored in Spotler is removed.
---
## Automatic Anonymization
The connector anonymizes a Spotler contact automatically in the following situations, without any
manual action required.
### Contact Deleted
When a Contact, Lead, or Account is **deleted** in Dynamics 365, the connector immediately
anonymizes the corresponding contact in Spotler.
### Contact Has No Email Address
During every sync, the connector checks whether the contact has a valid email address. If no email
address is present, the contact is anonymized in Spotler. Sending emails to a contact without an
address is not possible, so retaining their data in Spotler serves no purpose.
### Do Not Email
If the **Do Not Email** field (`donotemail`) is set to `true` on the Contact or Lead in Dynamics
365, the contact is anonymized in Spotler during the next sync. This field signals that the person
has explicitly refused electronic communication.
> **Note:** The **Bulk Email** field (`donotbulkemail`) is handled separately — it resets all
> Spotler permissions to false (opt-out) but does not trigger anonymization.
### Contact Inactive (Deactivated)
Deactivating a Contact or Lead in Dynamics 365 can optionally trigger anonymization in Spotler.
This behaviour is controlled by the **Anonymize Contact When Inactive** setting in the connector
configuration. When enabled, deactivated contacts are anonymized during the next sync. When
disabled, deactivation has no effect on the Spotler contact.
---
## Explicit Anonymization
To anonymize a contact on demand, create a Spotler Job with the **Anonymize Contact** operation:
1. Select the Customer (Account/Contact) or Lead
2. Save the job
The connector calls Spotler's anonymization endpoint. On success, the job result shows **HTTP 410
Gone** — this is the expected response and indicates the contact has been removed from Spotler. If
the contact was already anonymized, the result is **HTTP 404** which is also treated as success.
---
## After Anonymization
Once a contact is anonymized in Spotler:
- Their profile data (name, email, custom fields) is permanently erased in Spotler
- Future sync jobs for this contact will find no matching Spotler record and will re-create the
contact if it still has a valid email address and is active in Dynamics 365
- If the cause of anonymization is still present (e.g. `donotemail = true`), the new sync will
anonymize the contact again immediately
To permanently prevent a contact from being synced to Spotler, deactivate the record in Dynamics
365 with **Anonymize Contact When Inactive** enabled, or ensure the Do Not Email field remains set.
# Bounces
_✍️ DRAFT : IN PROGRESS_
Contact status:
- Active = Current contact base
- Inactive = Bounces and unsubscribe
Status:
- **Active : Static**, only exist in a static list, you can't select/filter them in a dynamic list (unless you reference the static list directly)
- **Active: Dynamic**, exist overall, can be selected and filtered using dynamic lists
- **Inactive: Soft bounce (4x)**, can't deliver the email at this time, already tried 4x. If Soft bounce but retries <4x it is still Active.
- **Inactive: Hard bounce (1x)**, can't deliver the email (email doesn't exist or is wrong)
- **Inactive: Opt-out**, Unsubscribed of everything
- **Inactive: Permanent**, explicit set to don't send any emails
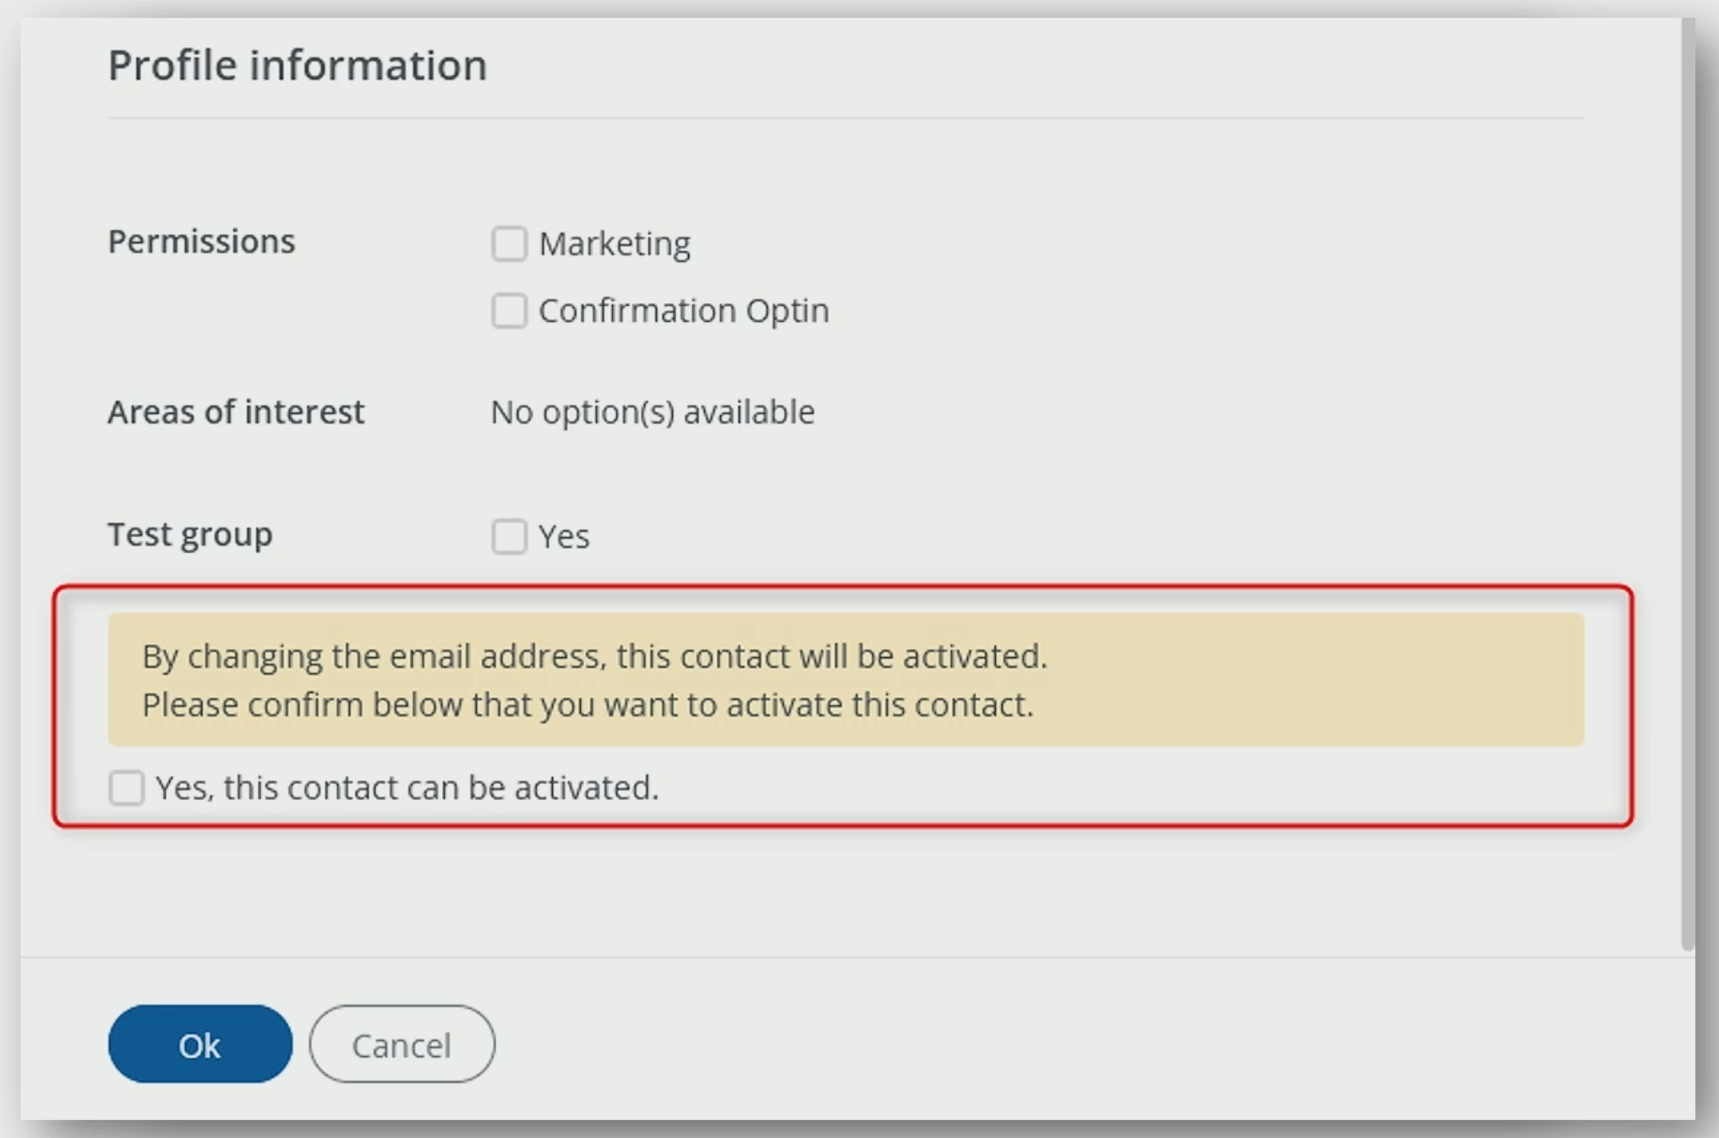
## How to solve bounces?
Change the email-address, the contact will be activated again.
Best practice: when hard bounce then send an internal notification (a task or email) to correct the email address
Reporting
# Spotler Info
_✍️ DRAFT : IN PROGRESS_
🚀_NEW FEATURE : COMING_
# Bulk Mailings
✍️ DRAFT : IN PROGRESS
To do bulk mailings, like a Newsletter, Spotler has the [Mailing module](https://helpcenter.spotler.nl/hc/en-us/articles/360008482993-Introduction-Mailings-).
The information about these bulk mailings can be viewed in multiple ways inside of Dynamics 365. Each email send to a recipient from the mailing can be stored as an Email Activity for the specified Contact, Lead or Account. For each bulk mailing a Campaign is created in Dynamics 365 with insights about the mailing. Interactions with this mailing like Opens, Clicks, Bounces and Unsubscribes, are stored as Campaign Responses.
Which information is being stored in Dynamics 365 is configurable:
- Create Email/Phone Activities for Bulk Mailings? Yes/No
- Create Campaign for Bulk Mailings? Yes/No
- Create Campaign Responses for Bulk Mailings?Opens/Clicks/Bounces/Unsubscribes
See the following chapters for more details:
* [Campaign](#campaign)
* [Campaign Responses](#campaign)
---
## Campaign
Campaigns traditionally are being used to do bulk mailings within Dynamics 365. We now use Spotler [Mailing](https://helpcenter.spotler.nl/hc/en-us/articles/360008482993-Introduction-Mailings-) to distribute the emails to recipients, but we still use Campaign in Dynamics 365 to store insights and interactions about the bulk mailing.
When you have created a new Mailing in Spotler and it has started distributing the emails to recipients, a new Campaign will be created in Dynamics 365 by the connector. The name of the Campaign is the same as the name of the Mailing.
TODO: How to mark a Campaign as a Bulk Mailing sent by Spotler?
### Insights
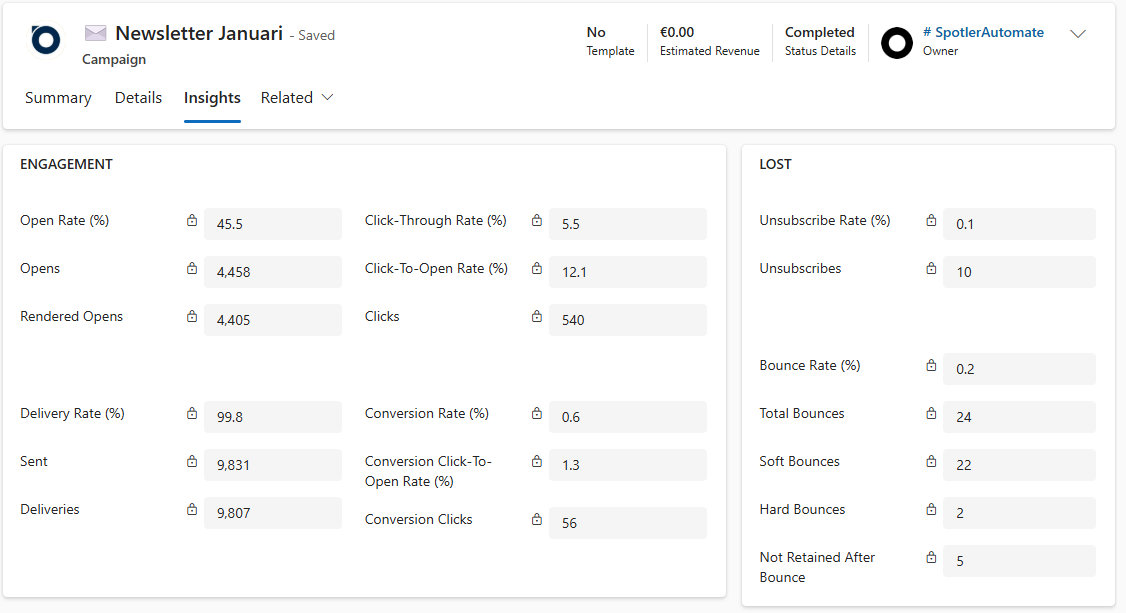
In a Campaign you can see the following information about the mailing:
| Display Name (_Name_) | Description | Data type |
|------------------------|-------------|-----------|
| # Sent
_dh_SentCount_ | Total number of emails sent | Whole Number |
| # Hard Bounces
_dh_HardBounceCount_ | Number of unique recipients whose email address generated a hard bounce | Whole Number |
| # Soft Bounces
_dh_SoftBounceCount_ | Number of unique recipients whose email address generated a soft bounce | Whole Number |
| # Total Bounces
_dh_BounceCount_ | Number of unique recipients whose email address generated a hard or soft bounce | Whole Number 🔢 |
| # Successful Deliveries
_dh_DeliveryCount_ | Number of emails that were delivered to recipients’ inboxes, calculated by subtracting hard and soft bounces from the total number of emails sent | Whole Number |
| # Opens
_dh_OpenCount_ | Number of unique recipients who opened the email. An email is considered opened if the measuring pixel is downloaded or if a trackable link is clicked. | Whole Number |
| # Rendered Opens
_dh_RenderedOpenCount_ | Number of unique recipients who have downloaded the measuring pixel in the email. Clicked links are not counted. | Whole Number |
| # Clicks
_dh_ClickCount_ | Number of unique recipients who clicked through via the email | Whole Number |
| # Conversion Clicks
_dh_ConversionClickCount_ | Number of unique recipients who clicked on a conversion link | Whole Number |
| # Unsubscribes
_dh_UnsubscribeCount_ | Number of unique recipients who unsubscribed (through an unsubscribe form, list-unsubscribe header, or spam alert) | Whole Number |
| **KPI's** | | |
| Delivery Rate (%)
_dh_DeliveryRate_ | Percentage emails that were delivered to recipients’ inboxes, calculated by subtracting bounces from the number of emails sent, then dividing that number by emails sent. | Decimal 🔢 |
| Bounce Rate (%)
_dh_BounceRate_ | Percentage of emails that cannot reach a recipient’s mailbox and get redirected back to a sender | Decimal 🔢 |
| Open Rate (%)
_dh_OpenRate_ | Percentage unique recipients that opened the email out of those who received it (OR) | Decimal 🔢 |
| Click-Through Rate (%)
_dh_ClickThroughRate_ | Percentage unique recipients that clicked on a link in the email out of those who received it (CTR) | Decimal 🔢 |
| Click-To-Open Rate (%)
_dh_ClickToOpenRate_ | Percentage unique recipients that clicked on a link in the email out of those who opened it (CTOR) | Decimal 🔢 |
| Conversion Rate (%)
_dh_ConversionRate_ | Percentage unique recipients that clicked on a conversion link out of those who received the email (CR) | Decimal 🔢 |
| Conversion Click-To-Open Rate (%)
_dh_ConversionClickToOpenRate_ | Percentage unique recipients that clicked on a conversion link out of those who opened the email (CCTOR) | Decimal 🔢 |
| Unsubscribe Rate (%)
_dh_UnsubscribeRate_ | Percentage unique recipients that unsubscribed from the email list (permission) out of those who received it | Decimal 🔢 |
🔢 = Calculated field
## Campaign Responses
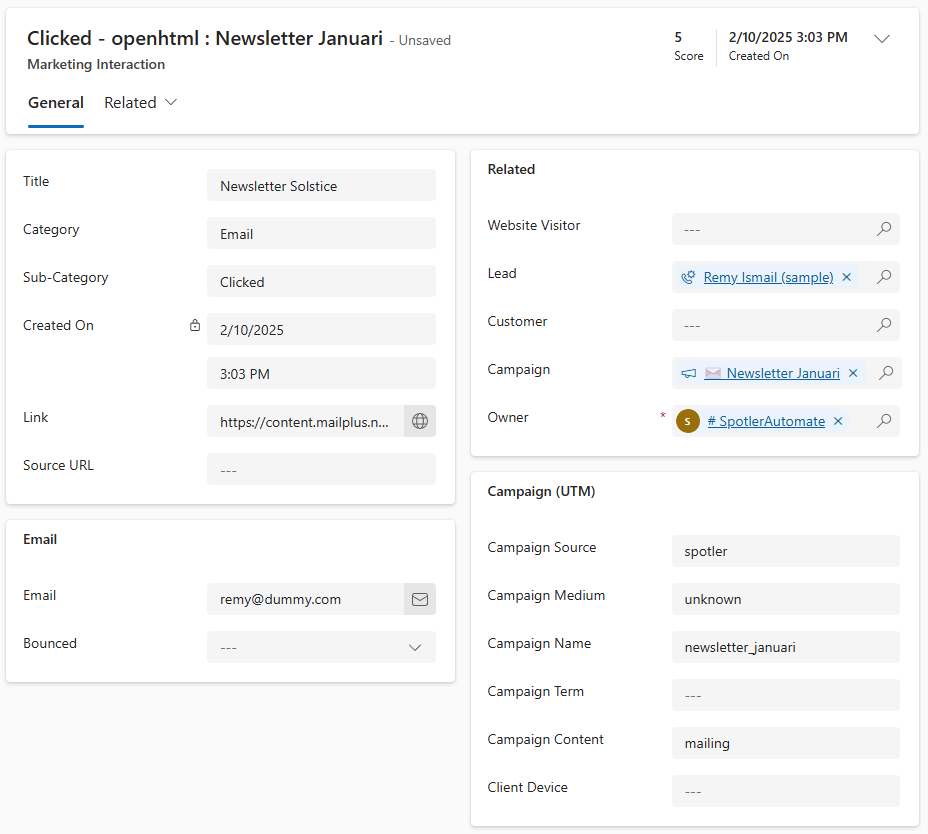
# Marketing Interactions
✍️ DRAFT : IN PROGRESS
Spotler tracks interactions like Email Sent, Email Opened, Email Clicked, etc. These are stored in Dynamics 365 as Marketing Interactions.
## Contact Form
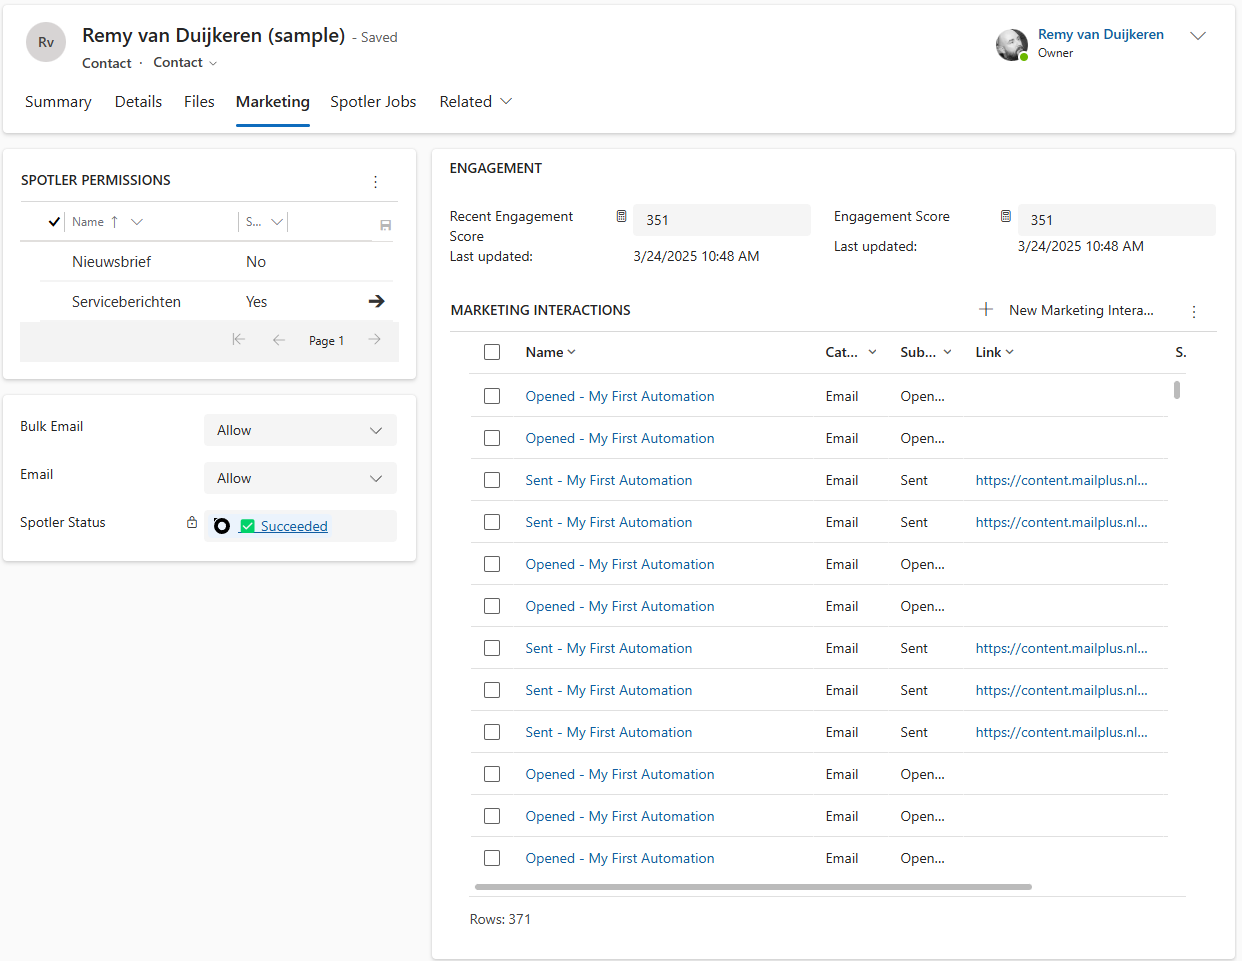
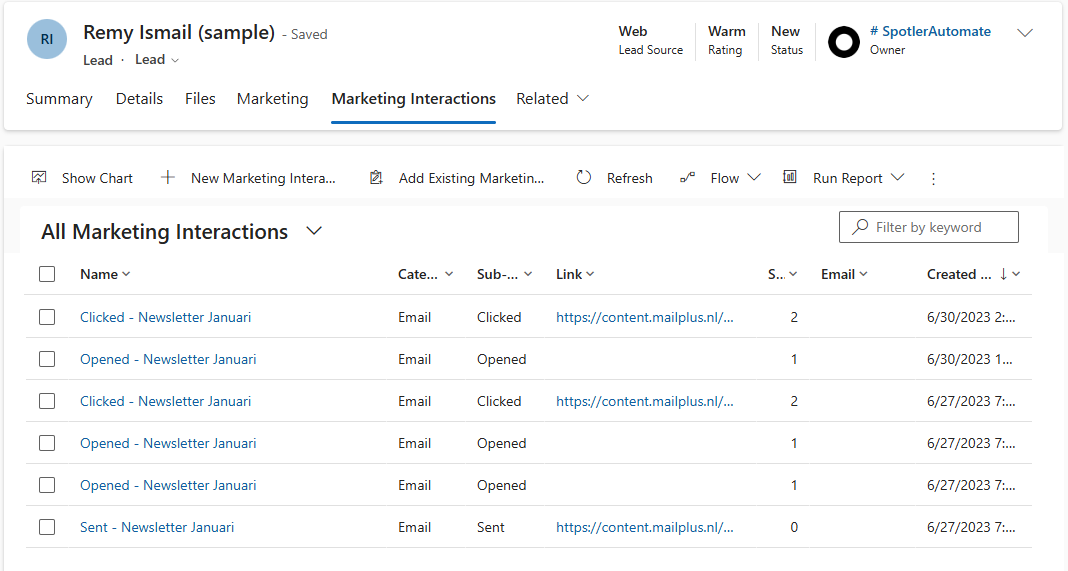
## Details
# Engagement in Timeline
✍️ DRAFT : IN PROGRESS
Email Interactions can be shown in the [Timeline](https://learn.microsoft.com/en-us/power-apps/user/add-activities) of the specific Contact, Lead or Account.
There is a setting **TimelineInteractions** to configure which interactions are visible in the timeline.
## Email


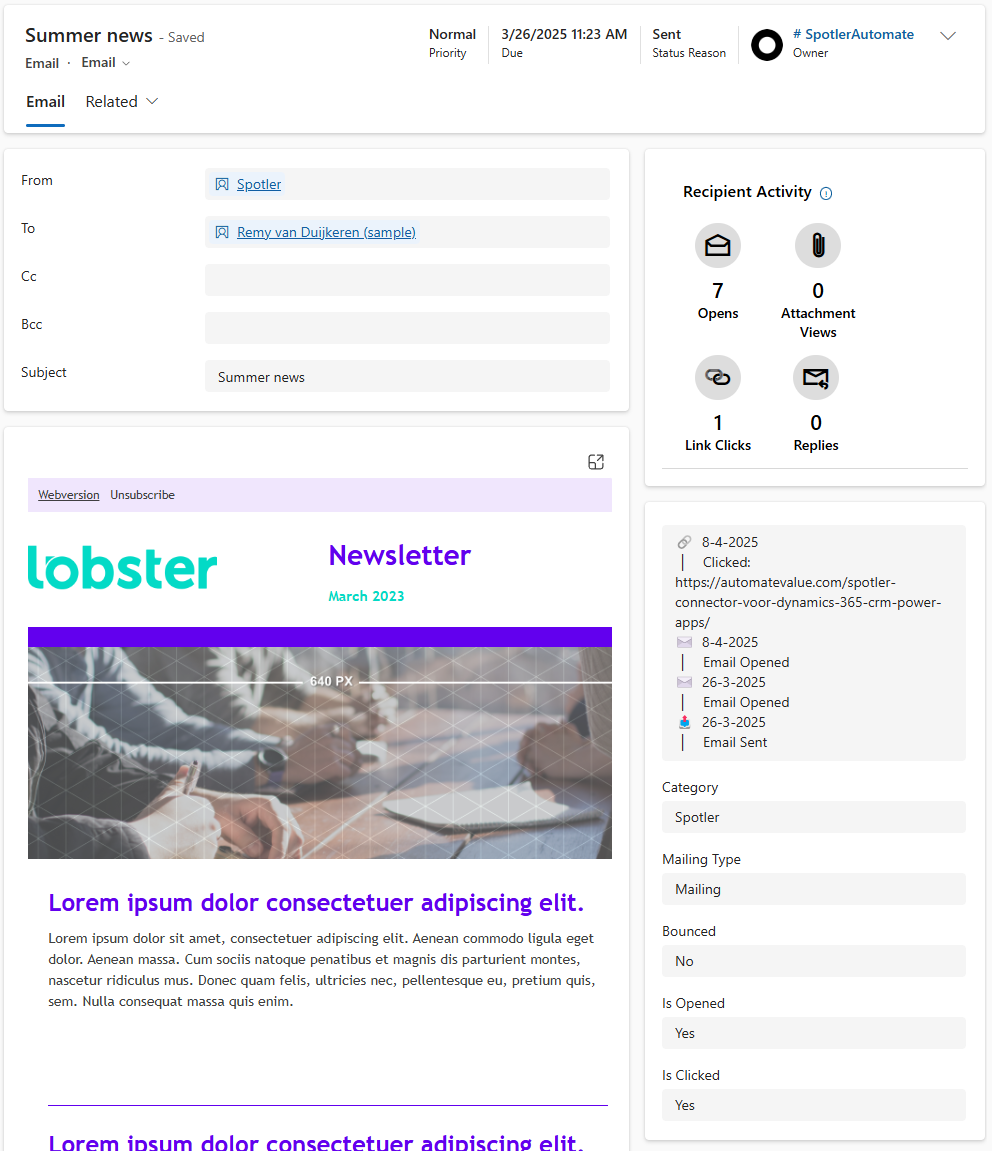

### Email Engagement
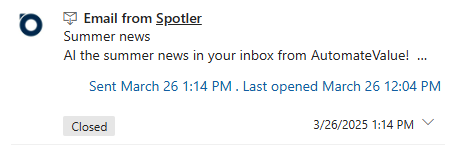
If you have Dynamics 365 Sales module, enable [Email Engagement](https://learn.microsoft.com/en-us/dynamics365/sales/configure-email-engagement#enable-email-engagement) for the best experience.
This will make the **Sent** and **Last Opened** info directly visible in the timeline on the email (see below).
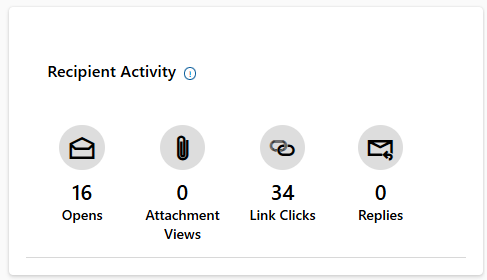
When opening the email there will also be additional **Recipient Activity** info block (see below).
Automate
# Spotler Jobs
Spotler Jobs (🇳🇱 Spotler Taken) are the core of the connector. They are being used to give a command to the connector to execute a task.
The connector uses Jobs to execute operations in Spotler, but you can also create them yourself. You can create Jobs manual in the UI but also create them in Processes or Workflows/(Cloud)Flows to customize and extend Dynamics 365.
You can use Spotler Jobs in Workflows, Business Process Flows, Power Automate and Plugins to fully automate actions in Spotler.
* [View Spotler Jobs](#view-spotler-jobs)
* [Create Spotler Job](#create-spotler-job)
---
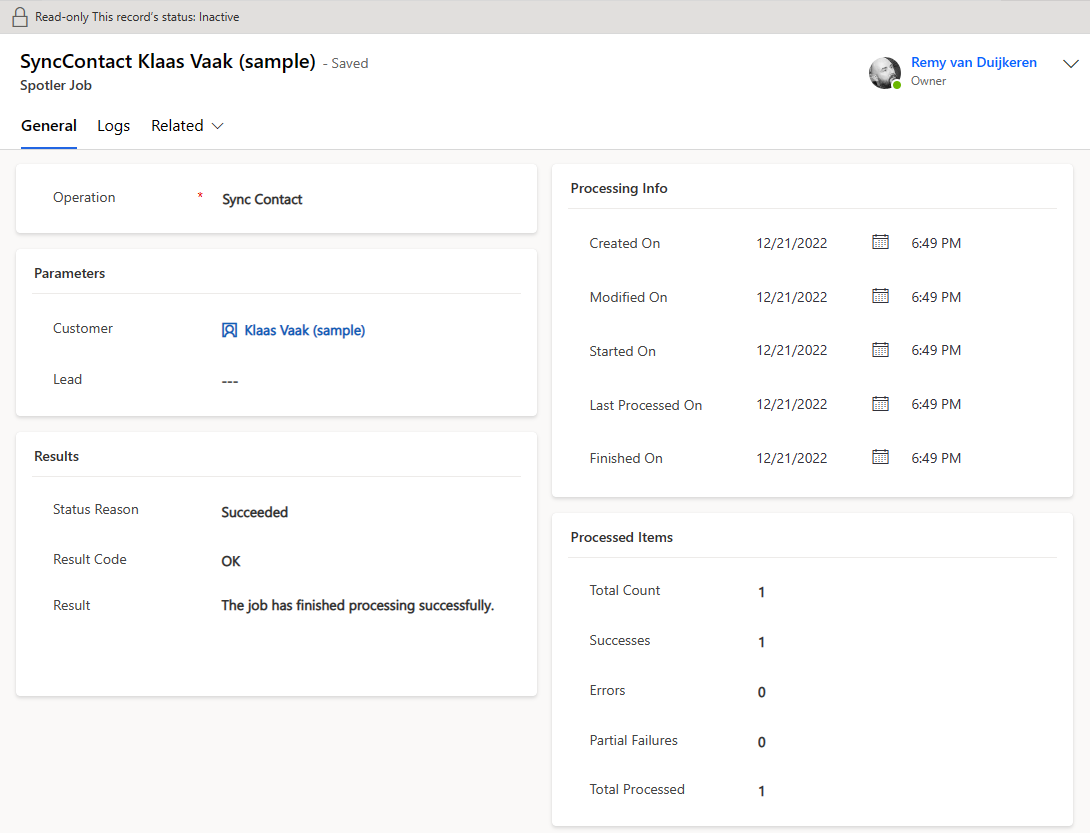
## View Spotler Jobs
Spotler Jobs are often run for a Contact, Lead or Account. Also Marketing Lists can have Spotler Jobs.
When you have one of these records open, you can view Spotler Jobs under **Related > Spotler Jobs**.
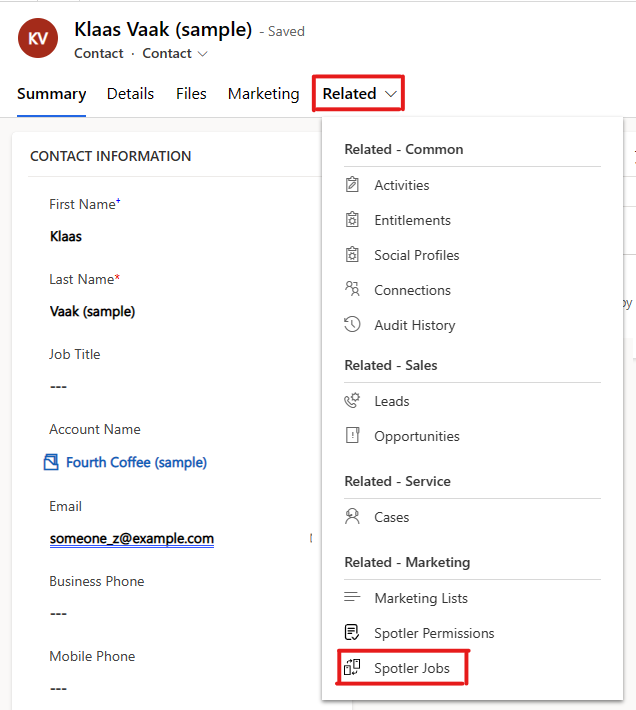
By clicking on Spotler Jobs a list will open with all the related Spotler Jobs with their status.

By clicking on the name of the Spotler Job (or double clicking the row) it will open and details about the processing are shown.
---
## Create Spotler Job
At the same place where you can [view the Spotler Jobs](#view-spotler-jobs), you can also create a new Spotler Job.
Press **+ New Spotler Job** to create a new Spotler Job.
This will open the form to create a new Spotler Job. You can select the [operation](#operations) you want to execute and the parameters for the operation.
Press **Save** or **Save & Close** to create the _Spotler Job_. This will trigger the Job to start executing.
### Operations
Every _Spotler Job_ needs to have an _operation_. An _operation_ is the action that needs to be executed. The following operations are available.
| Operation | Parameters | Description |
|-----------|------------|-------------|
| Sync Contact
(480000006) | | Sync the selected Customer or Lead as _Contact_ to Spotler. |
| [Start Automation](../23/trigger-automations)
(480000001) | - Customer or Lead
- Automation
- [Automation Fields](../23/trigger-automations#automation-fields) (optional)
| For the selected Customer or Lead, start the Automation or Campaign in Spotler. |
| [Stop Automation](../23/trigger-automations#stop-automation)
(480000002) | - Customer or Lead
- Automation
_or_- AutomationContactId
| For the selected Customer or Lead, stop the Automation or Campaign in Spotler. |
| Refresh Automations
(480000004) | None | Check the available Automations and Campaign in Spotler and update them in Dynamics 365, so that they can be selected for the _'Start/Stop Automation'_-operation.
💡Tip: Twice a day, Automations are already being synchronized to Dynamics 365. |
| [Add Tag](../22/tagging-scoring#add-tag)
(480000009) | | For the selected Customer or Lead, add the Tag.
💡Tip: If no selected Customer or Lead, the Tag will still be added to Spotler. |
| [Remove Tag](../22/tagging-scoring#remove-tag)
(480000010) | | For the selected Customer or Lead, remove the Tag/Score. |
| [Set Score](../22/tagging-scoring#set-score)
(480000011) | - Customer or Lead
- Score Name¹
- Score Value²
| For the selected Customer or Lead, Set the Score with the given Value. Value must be a number. |
| [Increase Score (+)](../22/tagging-scoring#increase-score)
(480000012) | - Customer or Lead
- Score Name¹
- Score Value²
| For the selected Customer or Lead, Increase the Score with the given Value. Value must be a positive number. |
| [Decrease Score (-)](../22/tagging-scoring#decrease-score)
(480000013) | - Customer or Lead
- Score Name¹
- Score Value²
| For the selected Customer or Lead, Decrease the Score with the given Value. Value must be a positive number. |
| Anonymize Contact
(480000008) | | For the selected Customer or Lead, anonymize the Contact in Spotler.
💡Tip: When you delete a contact or make it inactive, this operation will already run. |
| Deactivate Contact
(480000005) | | For the selected Customer or Lead, make the Contact in Spotler inactive.
⚠️ Warning: You can not re-activate it again! |
| Purge Contact
(480000007) | | For the selected Customer or Lead, clear out the Contact data in Spotler. Deprecated: Use Anonymize Contact |
| [Sync List](../21/sync-marketing-lists)
(480000000) | | Sync the selected Marketing List to a _Dynamic List_ in Spotler. |
| [Add To Audience](../45/add-remove-from-audience#add-to-audience)
(480000003) | - Customer or Lead
- List Name¹ or Marketing List (obsolete)
| Add the selected Customer or Lead to _Dynamic List_ in Spotler. _Dynamic List_ will be created, if it doesn't exist.|
| [Remove From Audience](../45/add-remove-from-audience#remove-from-audience)
(480000014) | - Customer or Lead
- List Name¹
| Remove the selected Customer or Lead from _Dynamic List_ in Spotler. _Dynamic List_ must exist for this to work. |
| [Set Contact Field](../58/set-clear-contact-field#setting-a-field-value)
(480000015) | - Customer or Lead
- Spotler Field¹
- Value²
| Set a specific Spotler field to an explicit value; use `fieldname:itemname` syntax for list fields |
| [Clear Contact Field](../58/set-clear-contact-field#clearing-a-field-value)
(480000016) | - Customer or Lead
- Spotler Field¹
| Clear (null) a specific Spotler scalar field value |
¹ Parameter Name (dh_ParameterName)
² Parameter Value (dh_ParameterValue)
# Tagging & Scoring
Spotler supports [Tagging & Scoring](https://helpcenter.spotler.nl/hc/en-us/articles/7152832744850-Introduction-Tagging-Scoring). You can use this to segment your contacts and to determine the value of your contacts. This way you can send more targeted and relevant messages to your contacts.
* [Tagging contacts](#tagging-contacts)
* [Scoring contacts](#scoring-contacts)
* [Timeline Posts](#timeline-posts)
---
## Tagging contacts
Tags can be set yourself and can be applied for all kinds of reasons. Usually the purpose of tagging is to capture a phase or interest that a contact is in. By grouping contacts with the same tags, you create relevant segments (using Dynamic Lists). You make subsequent marketing campaigns for these segments.
### Add Tag
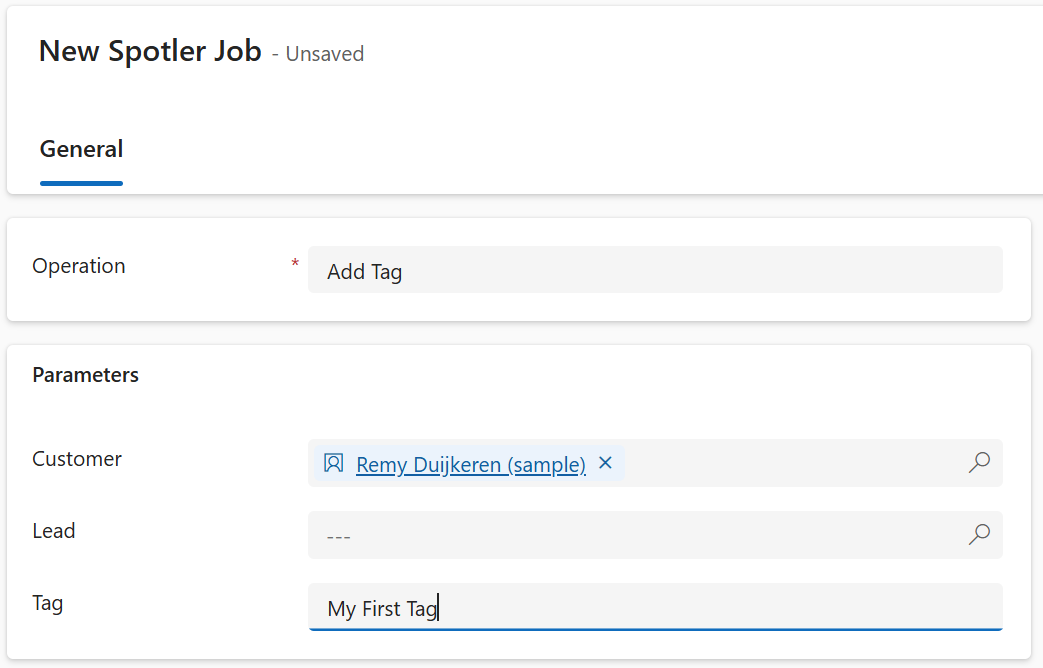
To add a Tag from Dynamics 365, we create a _[Spotler Job](../25/spotler-jobs)_ with the operation **Add Tag**.
Select the Customer (=Account/Contact) or a Lead for which you want to add the tag.
Fill in the tag you want to add. If a tag doesn't exist in Spotler yet, it will be created automatically.
Now press **Save** to create the _Spotler Job_. This will add the tag to the contact in Spotler.
💡Tip: You can also just add a Tag to Spotler by leaving the Customer and Lead blank.
### Remove Tag
To remove a Tag from Dynamics 365, we create a _[Spotler Job](../25/spotler-jobs)_ with the operation **Remove Tag**.
Select the Customer (=Account/Contact) or a Lead for which you want to remove the tag.
Fill in the tag you want to remove. You can remove multiple tags at once by separating them with a comma or a semicolon.
Now press **Save** to create the _Spotler Job_. This will remove the tag to the contact in Spotler.
💡Tip: You also use this operation to remove a Score!
---
## Scoring contacts
By also using scoring, you give more meaning to a tag. With scoring you give a value in numbers to a tag.
For example: I have a tag _'Lead'_ and I give it a score of 10. This means that a contact with the tag _'Lead'_ has a score of 10.
You can set the score to a specific number, increase or decrease it for certain action the contact takes, such as downloading several white papers. For each download the contact receives a +10 score within the _Lead_ tag. Or, you may want to give more important downloads +20. You can use this score to determine the lead value of a contact.
### Set Score
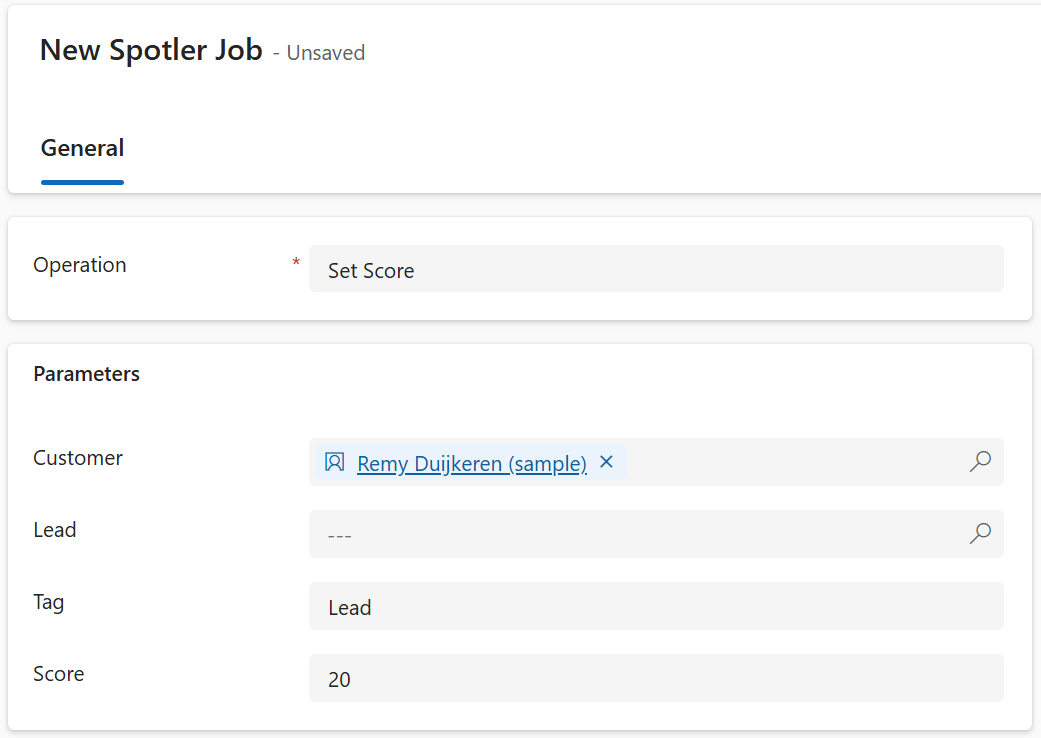
To add a Score from Dynamics 365, we create a _[Spotler Job](../25/spotler-jobs)_ with the operation **Set Score**.
Select the Customer (=Account/Contact) or a Lead for which you want to set the score.
Fill in the tag for which you want to set the score for. If a tag doesn't exist in Spotler yet, it will be created automatically.
Fill in the score you want to set the tag to. This needs to be a number, which can also be negative.
Now press **Save** to create the _Spotler Job_. This will update the tag with the specified score for the contact in Spotler.
### Increase Score (+)
To increase a Score from Dynamics 365, we create a _[Spotler Job](../25/spotler-jobs)_ with the operation **Increase Score (+)**.
This is the same as setting a score, but instead of setting a score, we increase the score with the specified number. The number most be positive.
If a tag doesn't exist in Spotler yet, it will be created automatically with a starting score of zero.
### Decrease Score (-)
To decrease a Score from Dynamics 365, we create a _[Spotler Job](../25/spotler-jobs)_ with the operation **Increase Score (+)**.
This is the same as setting a score, but instead of setting a score, we decrease the score with the specified number. The number most be positive.
If a tag doesn't exist in Spotler yet, it will be created automatically with a starting score of zero.
### Remove Score
See [Remove Tag](#remove-tag).
---
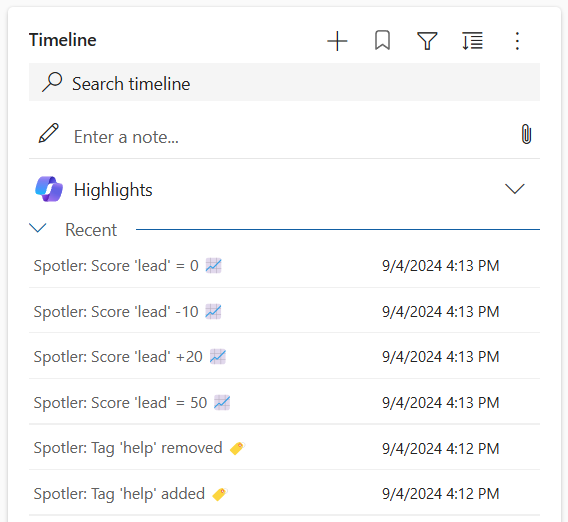
## Timeline Posts
When a tag or score has been successfully added or changed in Spotler, a post will be added to the [Timeline](https://learn.microsoft.com/en-us/power-apps/user/add-activities) in Dynamics 365. In this way it is clear for the user what has happend with the contact.
# Trigger Automations
Spotler has the [Automations module](https://helpcenter.spotler.nl/hc/en-us/articles/4403836193938-Introduction-Automations) and the older [Campaign module](https://helpcenter.spotler.nl/hc/en-us/articles/360034938254-Introduction-getting-started-with-campaigns). With these modules it is possible to send 1-on-1 mails based on certain changes, fully automated. In this way you can create full customer journeys.
With SpotlerAutomate you can also trigger these Automations (and [Campaigns](../30/trigger-campaigns)) from within Dynamics 365. Consider, for example, a welcome process for new customers, an e-mail with a brochure or an automatic _'customer lifecycle campaign'_ that is relevant to the recipient.
* [New Automation](#new-automation)
* [Start Automation](#start-automation)
* [Stop Automation](#stop-automation)
---
## New Automation
An **Automation** needs to be [created in Spotler](https://mailplus.spotler.help/hc/en-us/articles/5438755158546-New-Automation).
Add an **External Trigger** and give it a good label (this label will be visible in Dynamics 365). When you create this **External Trigger** it will automatically generate a Code.
>❗Don't forget to change the status of the Automation to _Final_ and [publish it](https://helpcenter.spotler.nl/hc/en-us/articles/4407729601042-Publisher).
Twice a day, published Automations will be synchronized to Dynamics 365.
>💡Tip: You can also refresh this yourself by creating a _[Spotler Job](../25/spotler-jobs)_ with the operation **Refresh Automations**.
---
## Start Automation
To start an Automation from Dynamics 365, we create a _[Spotler Job](../25/spotler-jobs)_ with the operation **Start Automation**.
Select the Customer (=Account/Contact) or a Lead for which you want to start the Automation.
Select the desired Automation you want to trigger. Keep in mind that the list contains both Automations (🚀) and [Campaigns](../30/trigger-campaigns) (📢)!
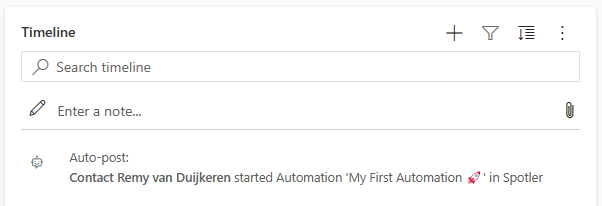
Now press **Save** to create the _Spotler Job_. This will trigger the Automation to start.
In Spotler, under _Automation > Publisher_, you can see then number of the times the published Automation is triggered. From here it is also possible to see the [Report](https://helpcenter.spotler.nl/hc/en-us/articles/5498046682514-Report-Automation).
When the Automation has been triggered, the _Spotler Job_ will be updated with the result. When successful the _Result Code_ will be `OK` and _AutomationContactId_ will have a value. This value represents the specific run that is started, which optionally can be used to stop the Automation.
Successful started Automations are also shown as post in the Timeline of the Contact, Lead or Account.
### Automation Fields
It is possible to personalize messages that are sent by Automations with data from Dynamics 365. This data can be added when we trigger an automation, and therefore doesn't need to be known to Spotler beforehand.
To define which data can be added to a trigger, we add [Automation Fields to message(s)](https://helpcenter.spotler.nl/hc/en-us/articles/360012079993-Trigger-automations#h_01G7AM77R22TZSSNGRWCK6HPMB)_, like `[automationfield:invoiceEmail]`. When we do this, the automation field `invoiceEmail` will become available to add to the trigger.
When we create a **Spotler Job** in Dynamics 365 and select the operation **Start Automation**, the **Automation Fields** will be prepopulated with all the possible fields and the expected type of the value (`STRING`, `URL` or `PRODUCTLIST`).
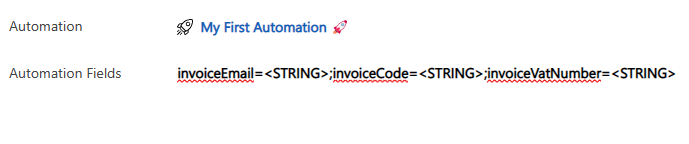
We need to replace the type hint with the actual data we want to pass to the Automation. Make sure each _Automation Field_ is separated with a semicolon (;) or a Enter (⏎). If you don't want to pass a value for a specific _Automation Field_, leave the field blank or remove it completely. The following examples are all valid:
```text
invoiceEmail=invoice@company.com;invoiceCode=;invoiceVatNumber=NL123456
```
```text
invoiceEmail=invoice@company.com;invoiceVatNumber=NL123456
```
```text
invoiceEmail=invoice@company.com
invoiceCode=
invoiceVatNumber=NL123456
```
```text
invoiceEmail=invoice@company.com
invoiceVatNumber=NL123456
```
When the type hint is a `PRODUCTLIST`, we can add more than one value to the Automation Field. They need to be placed in curly brackets, separated by commas (like `{,,,etc}`).
So:
```text
crosssell={}
```
Becomes:
```text
crosssell={123,567,891}
```
---
## Stop Automation
Sometimes we want to stop an already long running Automation. For example, when a _'New Customer Journey'_-Automation is started, but the customer canceled the purchase.
We can stop an Automation in the same way we started an Automation, by creating a _[Spotler Job](../25/spotler-jobs)_.
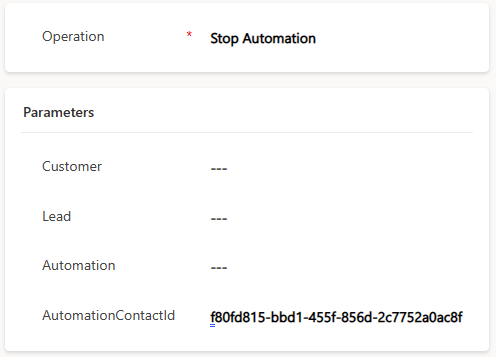
Create a _Spotler Job_ with the operation **Stop Automation**.
We select the Customer or Lead and the Automation we want to stop. Press **Save** to create the _Spotler Job_. This will trigger the Automation to stop.

This will stop all the running automation's for this specific Automation and Contact.
### Stop a specific run
If you only want to stop a specific run, you can use the _AutomationContactId_. The _AutomationContactId_ is stored in the _Spotler Job_ that triggered the Automation to start. No other parameters are needed, except for the _AutomationContactId_.
You can specify multiple _AutomationContactId_'s by separating them with a comma.
# Trigger Campaigns
Spotler has the [Automations module](https://helpcenter.spotler.nl/hc/en-us/articles/4403836193938-Introduction-Automations) and the older [Campaign module](https://helpcenter.spotler.nl/hc/en-us/articles/360034938254-Introduction-getting-started-with-campaigns). With these modules it is possible to send 1-on-1 mails based on certain changes, fully automated. In this way you can create full customer journeys.
With SpotlerAutomate you can also trigger these Campaigns (and [Automations](../23/trigger-automations)) from within Dynamics 365. Consider, for example, a welcome process for new customers, an e-mail with a brochure or an automatic _'customer lifecycle campaign'_ that is relevant to the recipient.
> ⚠️**Warning!** Campaigns is deprecated in Spotler. Use the more powerful [Automations](../23/trigger-automations).
* [New Campaign](#new-campaign)
* [Start Campaign](#start-campaign)
* [Stop Campaign](#stop-campaign)
---
## New Campaign
A **Campaign** needs to be created in Spotler. Add an External Trigger and give it a good name (this name will be visible in Dynamics 365). This will generate automatically a Campagne Code.

>❗Don't forget to change the status of the Campagne to _Active_.
Twice a day, Campaigns will be synchronized to Dynamics 365.
>💡Tip: You can also refresh this yourself by creating a _[Spotler Job](../25/spotler-jobs)_ with the operation **Refresh Automations**.
---
## Start Campaign
To start a Campaign from Dynamics 365, we create a _[Spotler Job](../25/spotler-jobs)_ with the operation **Start Automation**.
Select the Customer (=Account/Contact) or a Lead for which you want to start the Automation.
Select the desired Campaign you want to trigger. Keep in mind that the list contains both [Automations](../23/trigger-automations) (🚀) and Campaigns (📢)!
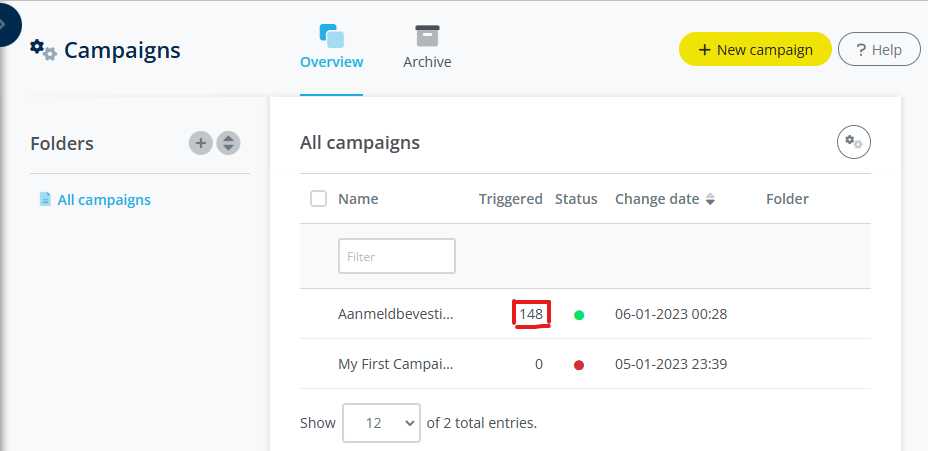
Now press **Save** to create the _Spotler Job_. This will trigger the Campaign to start.

In Spotler, under _Campaigns > Overview_, you can see then number of the times the Campaign is triggered.
---
## Stop Campaign
Sometimes we want to stop an already long-running Campaign. For example, when a _'New Customer Journey'_-Campaign is started, but the customer canceled the purchase.
We can stop Campaign the same way we started a Campaign, by creating a _[Spotler Job](../25/spotler-jobs)_.
Create a _Spotler Job_ with the operation **Stop Automation**.
We select the Customer or Lead and the Campaign we want to stop. Press **Save** to create the _Spotler Job_. This will trigger the Campaign to stop.
# Add/Remove from Audience
In Dynamics 365 or Power Apps, you usually have way more data than in your Spotler account. This extra data lets you create more detailed segmentations in Dynamics 365 or Power Apps.
You don’t need to sync all this data into Spotler to send relevant marketing messages.
Preferable you would use **Marketing Lists** to synchronize these segmentations into Spotler, see [Sync Marketing Lists](../21/sync-marketing-lists).
But **Marketing Lists** are not available in Power Apps, so this chapter describes an alternative way of creating these segmentations, as [**Dynamic Lists**](https://helpcenter.spotler.nl/hc/en-us/articles/360008483433-Dynamic-Lists) in Spotler.
For each Customer or Lead you can _Add To_ or _Remove it From_ a **Dynamic List** in Spotler, also called an **Audience**, using the Spotler Connector.
> ⚠️**Warning!** This feature is only available in Spotler Mail+ Automation and eCommerce, not for Spotler Mail+ Professional.
You can then access these [Lists](https://helpcenter.spotler.nl/hc/en-us/articles/360008341214-Introduction-Lists) in Spotler and use them for email marketing right away.
- [Add To Audience](#add-to-audience)
- [Remove From Audience](#remove-from-audience)
---
## Add To Audience
To add a Customer or Lead from Dynamics 365 to a List in Spotler, we create a _[Spotler Job](../25/spotler-jobs)_ with the operation **Add To Audience**.
Select the Customer (=Account/Contact) or a Lead for which you want to add to the specified List.
Fill in the List name you want to add. If the **Dynamic List** doesn't yet exist in Spotler, it will be created automatically.
Now press **Save** to create the _Spotler Job_. This will add the contact to the **Dynamic List** in Spotler.
> 💡Tip: By leaving the Customer and Lead blank, it will only create the List in Spotler.
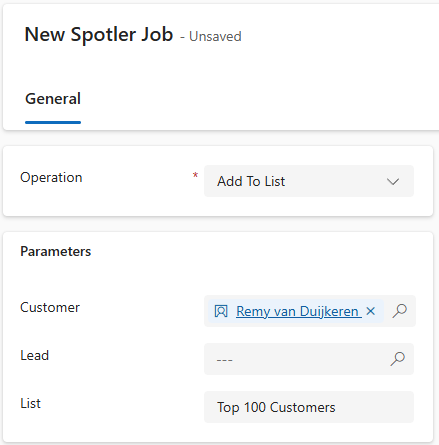
> ⚠️ Warning: If you already have synced a List using a Marketing List with the same name, then there will be two separate Dynamic Lists in Spotler, because these operations work independent from each other.
---
## Remove From Audience
To remove a Customer or Lead in Dynamics 365 from an existing List in Spotler, we create a _[Spotler Job](../25/spotler-jobs)_ with the operation **Remove From Audience**.
Select the Customer (=Account/Contact) or a Lead that you want to remove from the specified List.
Fill in the exact List name where the contact needs to be removed from.
Now press **Save** to create the _Spotler Job_. This will remove the Customer or Lead from the List in Spotler.
# Set / Clear Contact Field
## Overview
The **Set Contact Field** and **Clear Contact Field** operations let you push an explicit value to any Spotler contact field directly from Dynamics 365, without going through the normal Contact Sync.
This is useful for fields that cannot be mapped (computed values, order history, aggregates) or when you need to write a value once without maintaining a permanent sync.
## Setting a Field Value
Create a Spotler Job with the **Set Contact Field** operation. Select the customer or lead, enter the **Spotler Field Name**, and enter the **Field Value**.
The field name must exist in Spotler. You can use either the internal Spotler field name (e.g. `lastorderdate`) or the display name (e.g. `Last Order Date`). If the display name matches more than one field, the job fails with a validation error asking you to use the exact internal name instead.
**Type coercion:** The value is converted to the field's expected type before sending to Spotler. For example, a date field requires a parseable date string; an email field requires a valid email address. If the value cannot be converted, the job fails with `[JOB_NOT_VALID]` rather than sending an invalid value.
**Only unmapped Fields or Fields that sync to Dataverse:** Fields that are mapped and *only sync to Spotler* cannot be set directly, because a next Contact Sync overwrites the set field again.
Fields that *sync to Dataverse* or *both ways* are allowed. Unmapped Fields can always be set this way.
## Setting a List (Permission) Item
List fields — fields with multiple toggleable items, such as permissions or interests — require the `fieldname:itemname` syntax in **Spotler Field Name**, and a boolean in **Field Value**.
| Spotler Field Name | Field Value | Result |
|---|---|---|
| `permissions:Newsletter` | `true` or `ja` or `1` | Enables the Newsletter permission |
| `permissions:Newsletter` | `false` or `nee` or `0` | Disables the Newsletter permission |
The item name must match one of the options defined in the mapping for that field. Using the field name alone (without `:itemname`) on a list field will fail with a validation error.
## Clearing a Field Value
Create a Spotler Job with the **Clear Contact Field** operation. Select the customer or lead and enter the **Spotler Field Name**. No value is needed — the field is cleared in Spotler.
Only normal fields can be cleared. List fields (permissions, interests) cannot be cleared with this operation; use **Set Contact Field** with `fieldname:itemname` and value `false` to disable individual items instead.
# Example Automations
## React to Bounces
When a contact is inactive because of a bounce, send an internal notification so that the email address can be corrected.
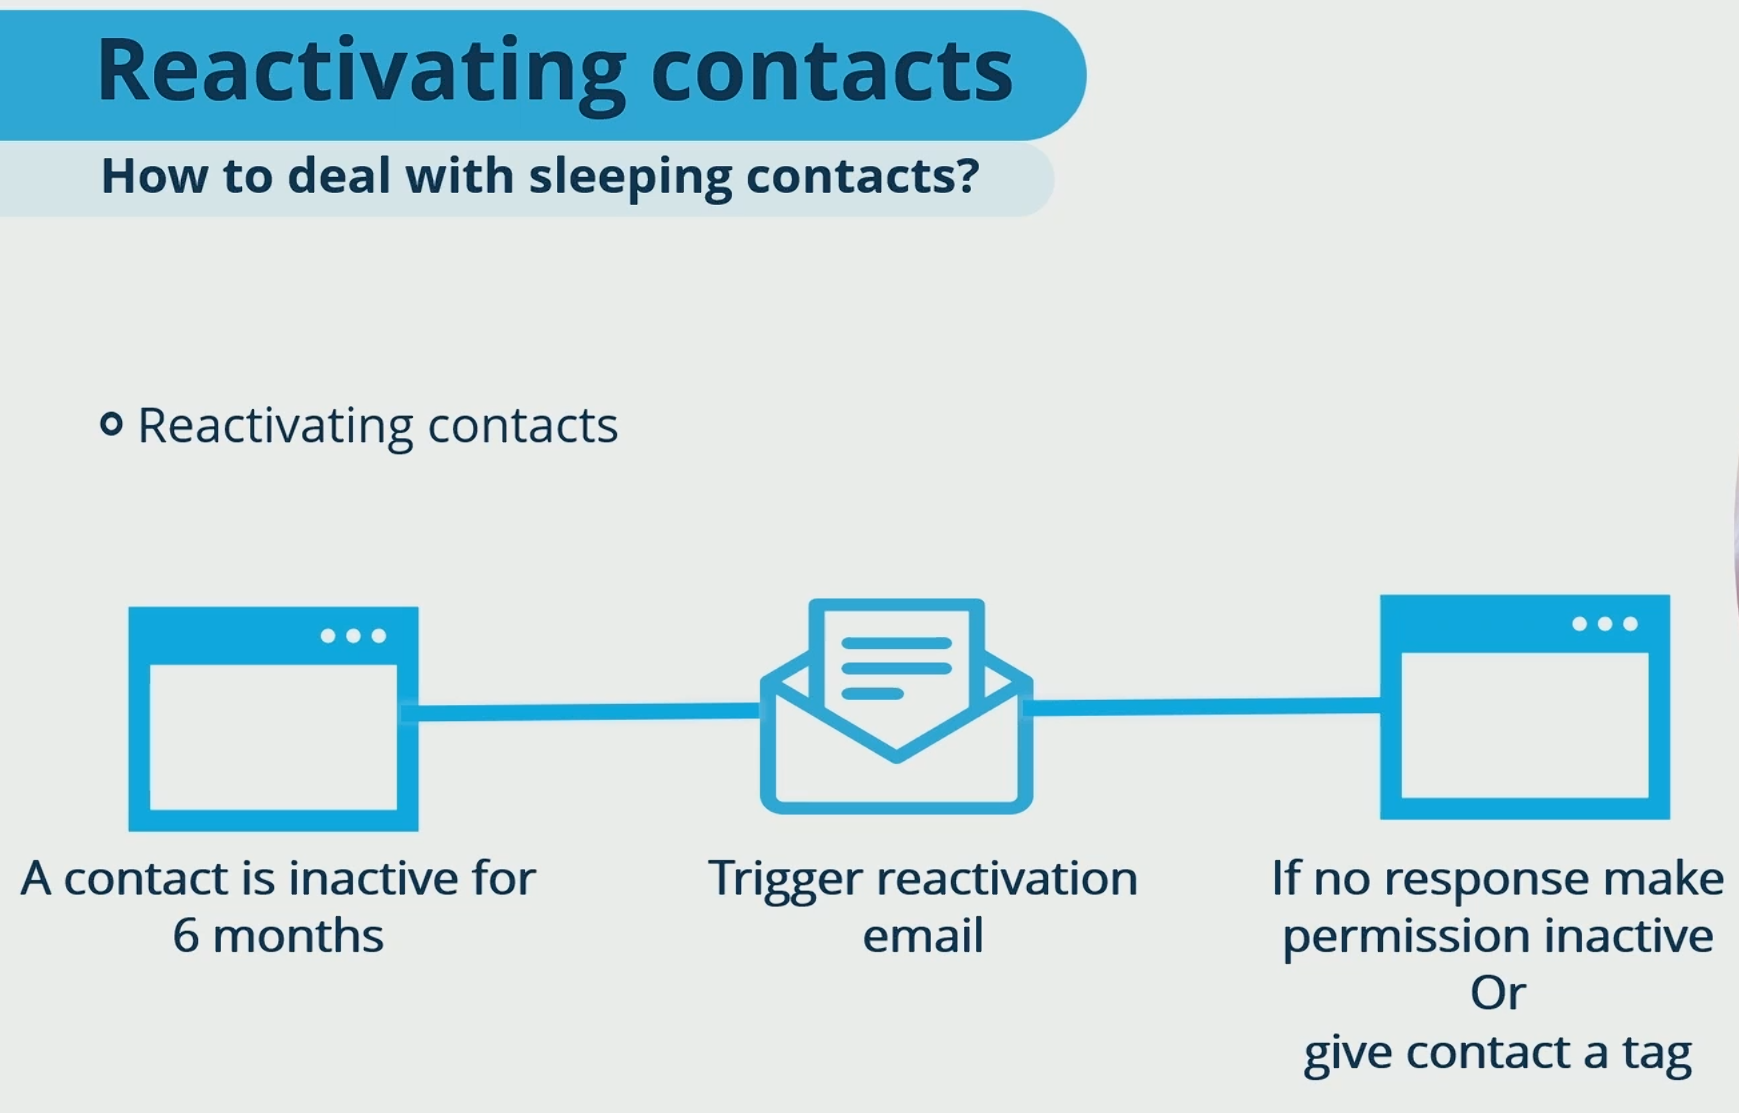
## Reactivation contacts
Contact that are not engaging give false impression on your contact base. Sometimes it is better to clean these up, by sending a reactivation email.
When no response, de-active the permission or tag them.
## Renewal Subscriptions or Licence Expiry
When a renewal is up-coming you could send an email for upgrading. Or inform them about a licence that is expiring.
**_Send the right message at the right time._**
Spotler Leads
🚀_NEW FEATURE : COMING_
# Website Visitors
✍️ DRAFT : IN PROGRESS
[Spotler Leads](https://spotler.com/en-gb/solutions/industries/b2b) discovers companies that visit your website, using [IP Lookup and Web Tracking](https://spotler.com/en-gb/blog/the-power-of-ip-lookup-and-web-tracking-for-b2b-marketers). Very valuable information for B2B companies.
The Spotler Connector can synchronize these Website Visitors, including the web pages they view, into Dynamics 365 CRM. Enriching existing customers and creating new leads.
> ⚠️**Warning!** This feature only works when Spotler Leads (GatorLeads) is enabled.
---
## View Website Visitors
View List, Hot List, My List, Focused View
View Details
View Visits
## Auto-matching existing Customers
## Promote to Lead or Customer
## Lead Rating, Status & Type
Advanced
# Setup
The installation of the integration consists of the following steps that needs to done by the customer (or their Dynamics 365 implementation partner):
## Preparation
### Provide environment information
To connect with Spotler we need the following information:
1. Spotler API Key and Secret ([Where can I find the Key and Secret of the Spotler REST API? – Spotler Help Center](Where can I find the Key and Secret of the Spotler REST API? – Spotler Help Center))
2. Dynamics 365 Organization URL and ID ([Determine your environment's organization ID and name](https://learn.microsoft.com/en-us/power-platform/admin/determine-org-id-name))
### Approve App for your organization
The connector requires access to your Dynamics 365 environment. This is done by granting Spotler Connector App access to your organization. This is done in two steps:
1. Add the Spotler Connector App to your organization. Use the following link for this https://automatevalue.com/spotlerautomate-access.
> ⚠️**Warning!** This can only be executed by a Global Administrator of Microsoft 365 (Active Directory)!
2. After completing step 1, you will arrive on a page stating that it was successful. This page describes how to add the Application user SpotlerAutomate to your Dynamics 365 environment. You can follow these steps, or we can do this together in step 3 below.
## Setup
[Download Solution](https://automatevalue.com/support/)
Once the previous steps have been completed, we can schedule an appointment to carry out the installation. This is often with the administrator of the Dynamics 365 environment who has the System Administrator role on your Dynamics 365 environment. We install a Solution and configure it together.
This step requires the Microsoft Power Platform CLI. It is useful to install this in advance before the meeting. See [Power Platform CLI](https://learn.microsoft.com/en-us/power-platform/developer/cli/introduction)
After testing the setup, the integration is live. Usually there are some follow-up meetings to tweak the mapping and/or give some explanation to users how the integration works.
# Database Fields
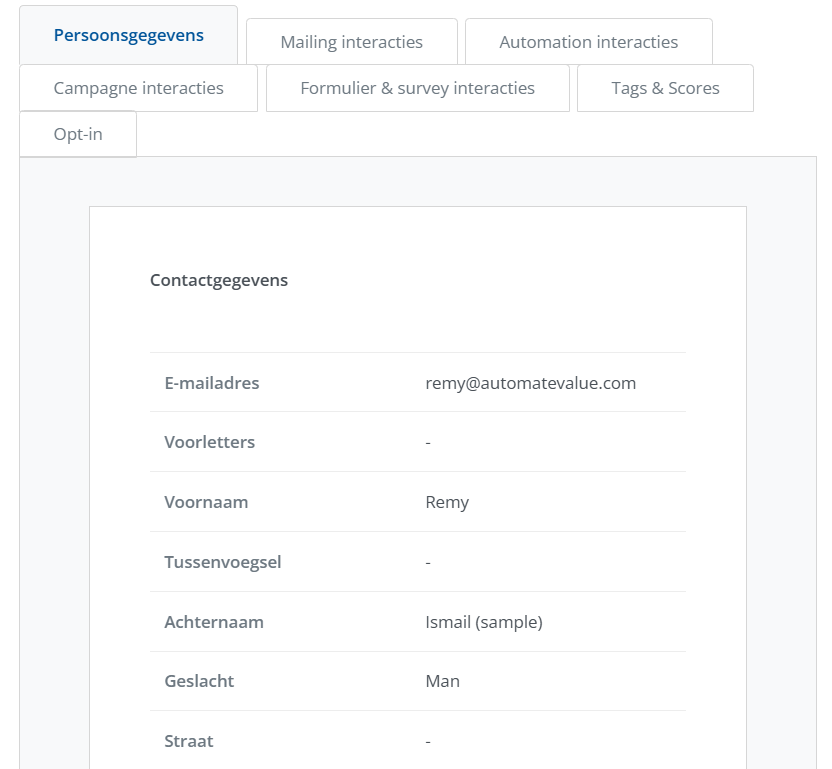
When you go to the profile of a contact in Spotler, it contains a number of fields with information about the contact.
These are database fields and can be altered.
## How to manage them
Do you need extra database fields in your account, because you want to collect more data with your forms? Or would you like to edit database fields? As the owner of an account, you have an overview of the database fields, and you can add and edit them.
> ℹ️ Info: Only the **Owner** can alter fields.
See [Database fields – Spotler Mail+ Help Center](https://mailplus.spotler.help/hc/en-us/articles/360026056314-Database-fields)
Fields that you don't need are best to make them not visible, so that they don't clutter your profile.
> ⚠️**Warning!** Fields that or **not** Visible are also not seen be the Spotler Connector!
You can move fields up and down and rename them. When renaming fields, you only rename the **_Display_ Name**, the underlying database name will stay the same. This is important because the Spotler Connector is [mapping](../37/mapping) to the **database name**.
There is also an option to **Delete data** of a field, which can be handy to clean up temporary or old data.
## The different types
- **Text**, anything text or text-like
- **List**, a list of options that can be selected or unselected
- **Birth date** and **Date**, a date (or datetime) which can be used for triggering journeys, like a birthday-gift or first-purchase journey.
- **Integer** (numeric), a number like age, which can be used to trigger journeys.
- **Currency**, a value that represents money.
>💡Tip: Add a Text field to store the Dynamics 365 Table name, for example **External Type** or **Source Table**. The Connector can then fill this field with the text: Account, Contact or Lead.
## Special Fields
There are couple of special fields which have an important role:
- **Permission**, a List field that contains the Spotler Permissions
- **External Id**, contains the Row Id of the source system, like the CRM Id. For Dynamics 365 this can be the Account-, Contact- or Lead Id.
> ⚠️**Warning!** Don't alter these fields in any way and keep them visible!
# Mapping
Contact details, among other things, are synced between Dynamics 365 and Spotler. A mapping describes which fields of Dynamics 365 maps with the [database fields in Spotler](../57/database-fields).
We will configure a simple default mapping and email the initial configuration of the mapping in an Excel document.
The mapping is stored in the AutomateValue Connector Platform and managed by AutomateValue. Changes can be requested by email (support@automatevalue.com).
Think about the fields do you want to map between both systems and let us know. Often it is useful to have a session with each other about what is possible and which fields you want to synchronize to Spotler.
Please note that fields may not be more than one level deep. For example, fields from Account can be included in the Contact synchronization, because that is one level (Contact->Account). It is also useful to think about which entities need to be synchronized: only Contact or Contact and Lead? Are all contacts allowed to go to Spotler or only with certain characteristics?
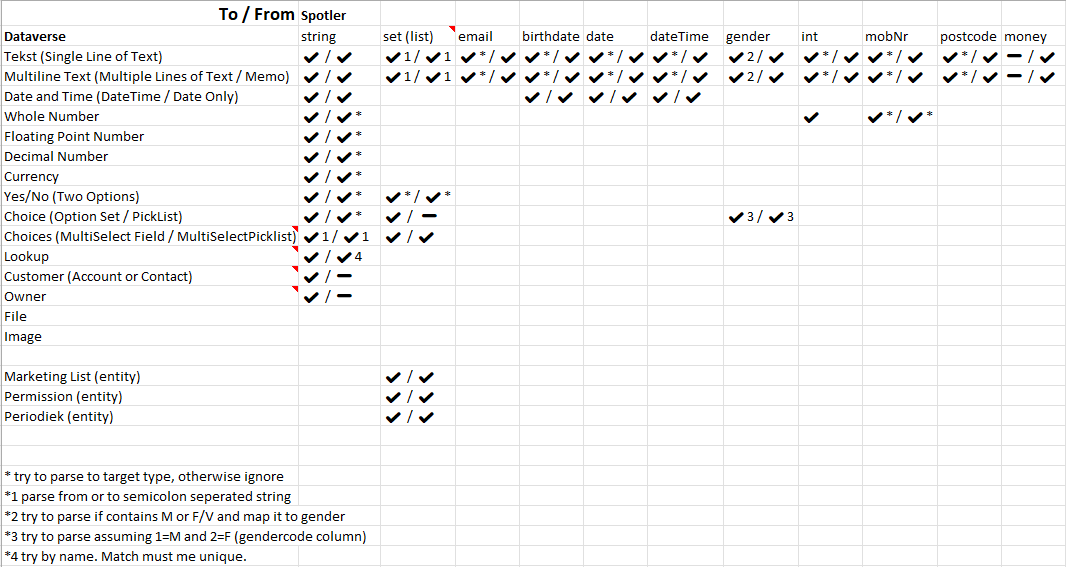
## Datatype Conversions
## Mapping row options
The mapping row needs the following params:
| Field | Value | Remark |
|--- | --- | -- |
| Contact Column | columnname | Contact field to map to in Dataverse |
| Lead Column | columnname | Lead field to map to in Dataverse |
| Account Column | columnname | Account field to map to in Dataverse |
| Entity Column | columnname | MembershipEntry field to map to in Dataverse |
| Sync Direction | ->, <- or <-> | Allowed direction to sync data |
| Filter | filtervalue | Only allow sync when column has this value |
| Spotler Column | fieldname | Field to map to in Spotler |
Instead of a column or field name you can also use the following special values:
| Special Value | Description |
|--- | --- |
| `$CustomerType` | The source entity type: contact, lead or account. |
| `$value:PRD` | Set hardcoded value, like PRD |
| `@map(permissions)` | Map to Permission entity |
| `@map(list)` | Map to Marketing List |
| `@map(periodiek)` | Map to Periodiek in iFund Engage365 |
| `lookupcolumn(typeRelatedTable).columnRelatedTable` or `lookupcolumn().columnRelatedTable`| Map column of related table, for example `parentcustomerid(account).accountnumber` or `ownerid(systemuser).fullname` or `slaid().name`. Max distance is 1 relationship. |
| `column1;column2;`| Select first not-null column value, for example `address1_line1;address1_line2;address1_line3` |
**Future ideas** for special values:
| Special Value | Description |
|--- | --- |
| `@concat(column1, " ", column2)` | Concat given column values and/or hard coded values, for example `@concat(address1_line1, ", ", address1_line2)` |
| `@child(dh_permissions).first(createdOn DESC).name` | Select column of first child record (params: table, column-result, column-match-id, sortby) |
| `@odata:odata-query` | Run odata query and use value, for example `@oadata:contacts?$select=fullname&$filter=(_parentcustomerid_valueeq $ID and statecode eq 0)&$orderby=createdon desc&$top=1` |
# Environment Variables
There are two environment variables that control what happens to the [Permissions (Subscriptions)](../32/sync-subscriptions) of a new Contact, Lead or Account that is created in Dynamics 365.
## permissions
The `permissions` environment variable defines which Permissions are being added to a new Contact, Lead or Account.
It auto populates the Permission subgrid will all the possible Permissions, so that a user can directly flag them them when they are creating a new contact, lead or account.
The value needs to be a semicolon separated string of permissions that match the permissions in Spotler. For example: `Newsletter;Productinfo;Servicenotifications;`
> ⚠️ Warning: This setting only applies to newly created Contact, Leads or Accounts created in Dynamics 365. If a new contact is created in Spotler then this setting doesn't have any effect!
The Spotler connector will daily update this environment variable with the latest permissions defined in Spotler, so you don't need to update this yourself.
> 💡Tip: If you don't want auto populating of permissions (and stop the auto updating by the Connector) than add a value with only a semi-colon, like `;`. Use the Value, not the Default value! This will disable this feature.
## permissions_enabled_by_default
The `permissions_enabled_by_default` environment variable defines which Permissions should be enabled (subscribed) for a new Contact, Lead or Account.
By default, for all new created Spotler Permissions in Dynamics 365 will be disabled (unsubscribed). This environment variable gives the option the enable (subscribe) some or all of them.
The value needs to be a semicolon separated string of permissions that you want to enable (subscribe) when they are being created for a new Contact, Lead or Account. For example: `Newsletter;Servicenotifications;`
Instead of specifying every individual permission, you can also add the keyword: `[All]`. This will make all new created permissions enabled for new Contact, Leads or Accounts.
| Value | Effect |
| -- | -- |
| Empty or `;` | Every permission is **disabled (unsubscribed)** |
| `Newsletter;Servicenotifications;` | These permissions will be **enabled (subscribed)**. Others will be disabled (unsubscribed) |
| `[All]` | Every permission is **enabled (subscribed)** |
| `[All];Newsletter;Servicenotifications;` | Every permission is **enabled (subscribed)**, except the ones explicit mentioned here. Those will be **disabled (unsubscribed)**! |
> ⚠️ Warning: This setting only works on the permissions defined in the `permissions` environment variable!
# Tables
The Spotler Connector tries to use as much is possible the existing tables and columns in Dynamics 365 to store data. In this way, when you remove the Connector from your environment, you don't lose this data.
But for some functionality we added a couple of tables and columns.
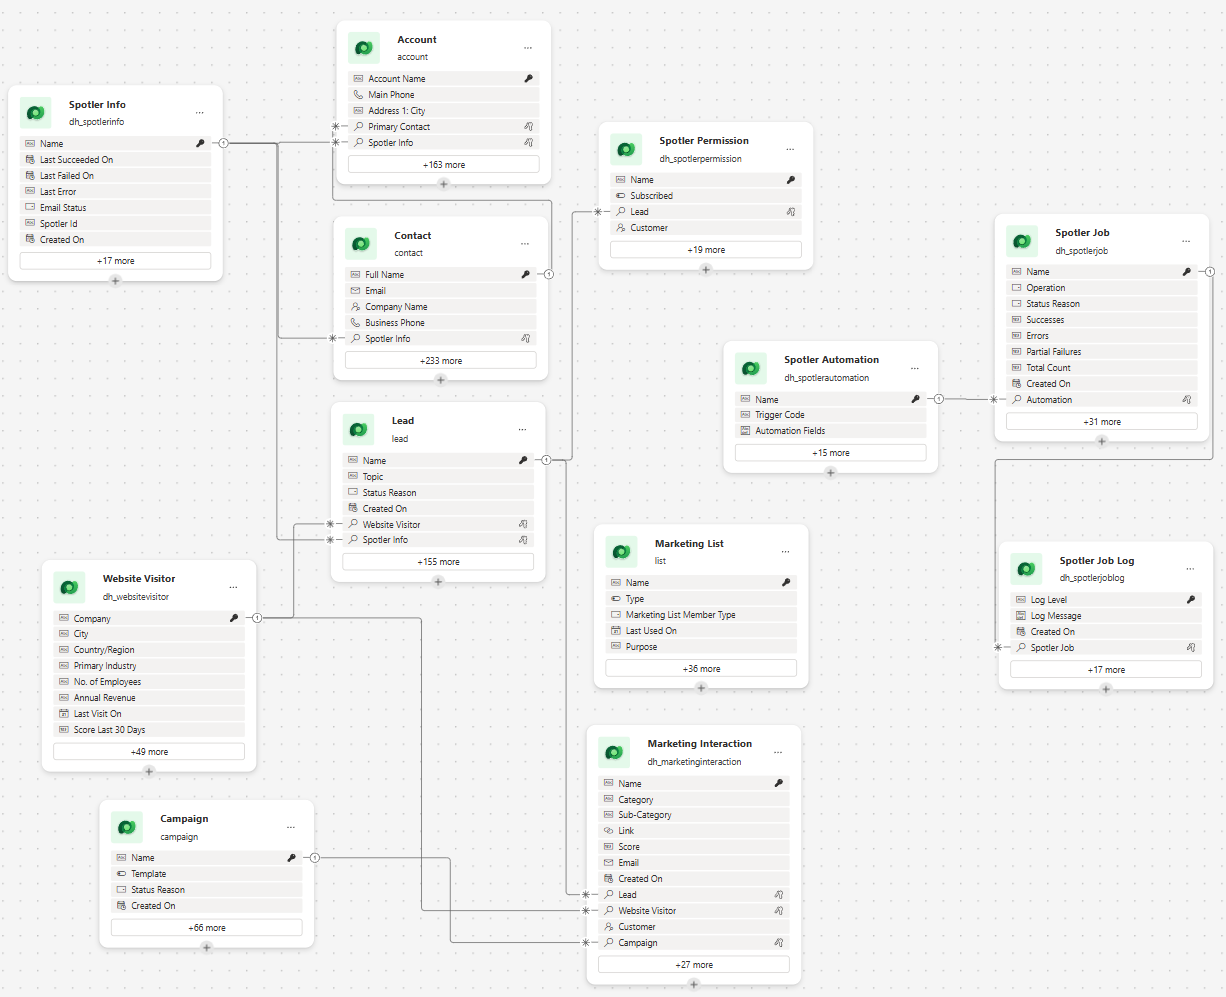
## Added Tables
- **Spotler Info**: Information about the synchronization to Spotler, like the last status and if it is active or inactive.
- **Spotler Permission**: Permission for which a Customer or Lead can (un)subscribe for.
- **Spotler Job (Log)**: Jobs for executing operations by the Spotler Connector.
- **Spotler Automation**: Contains the trigger codes of automations and campaigns in Spotler. Used to lookup in a Spotler Job.
- **Marketing Interaction**: Interactions related to marketing, like Website Visits, Email Opened or Email Clicked.
- **Website Visitor**: Tracked Website Visitors than can be promoted to leads, accounts or contacts, when they have a high score.
## Extended Tables
- Account
- Spotler Info (dh_SpotlerInfo)
- Website Visitor (dh_WebsiteVisitor)
- Engagement Score (dh_EngagementScore)
- Recent Engagement Score (dh_EngagementWeightedScore)
- Contact
- Spotler Info (dh_SpotlerInfo)
- Engagement Score (dh_EngagementScore)
- Recent Engagement Score (dh_EngagementWeightedScore)
- Lead
- Spotler Info (dh_SpotlerInfo)
- Website Visitor (dh_WebsiteVisitor)
- Engagement Score (dh_EngagementScore)
- Recent Engagement Score (dh_EngagementWeightedScore)
- Marketing List
- Spotler Info (dh_SpotlerInfo)
- Campaign
- Bounce Rate (%) (dh_BounceRate)
- Click-Through Rate (%) (dh_ClickThroughRate)
- Click-To-Open Rate (%) (dh_ClickToOpenRate)
- Clicks (dh_ClickCount)
- Conversion Click-To-Open Rate (%) (dh_ConversionClickToOpenRate)
- Conversion Clicks (dhConversionClickCount)
- Conversion Rate (%) (dh_ConversionRate)
- Deliveries (dh_DeliveryCount)
- Delivery Rate (%) (dh_DeliveryRate)
- Hard Bounces (dh_HardBounceCount)
- Not Retained After Bounce (dh_NotRetainedAfterBounceCount)
- Open Rate (%) (dh_OpenRate)
- Opens (dh_OpenCount)
- Rendered Opens (dh_RenderedOpenCount)
- Sent (dh_SentCount)
- Soft Bounces (dh_SoftBounceCount)
- Total Bounces (dh_BounceCount)
- Unsubscribe Rate (%) (dh_UnsubscribeRate)
- Unsubscribes (dh_UnsubscribeCount)
- Email
- Bounced (dh_spotlerbounced)
- Is Opened (dh_spotlerisopened)
- Is Clicked (dh_spotlerisclicked)
# Security Roles
The Spotler Connector installs two security roles into Dynamics 365:
1. Spotler User
2. Spotler Service
## Spotler User
This **Security Role** should be given to all users that work with your Dynamics 365 app.
It will allows to **View** the added Tables by the Spotler Connector and make it possible to **Edit** Spotler Permissions.
It also gives access to the [Spotler Hub App](../53/spotler-hub-app).
## Spotler Service
This **Security Role** contains the minimal permissions that the installed Application User of the Spotler Connector needs to have to do the synchronization.
Often these minimal permissions are not enough. For example, you can make complex queries for dynamic **Marketing Lists** which touches all kind of **Tables**.
So, the advice would be to assign the System Administrator role to the Application User.
# Configure Contact Sync
The connector syncs a contact from Dynamics 365 or Power App when a _[Spotler Job](../25/spotler-jobs)_ with the operation **Sync Contact** is created. This is the trigger for the connector to start doing its work.
You can create a _Spotler Job_ yourself, every time you make a change to a contact, but that would be cumbersome.
* [Workflows](#workflows)
* [Trigger Fields](#trigger-fields)
---
## Workflows
The connector installed a couple of [Workflows](https://learn.microsoft.com/en-us/power-apps/maker/data-platform/overview-realtime-workflows) that will trigger when an Account, Contact or Lead is created or changed and will create a _[Spotler Job](../25/spotler-jobs)_:
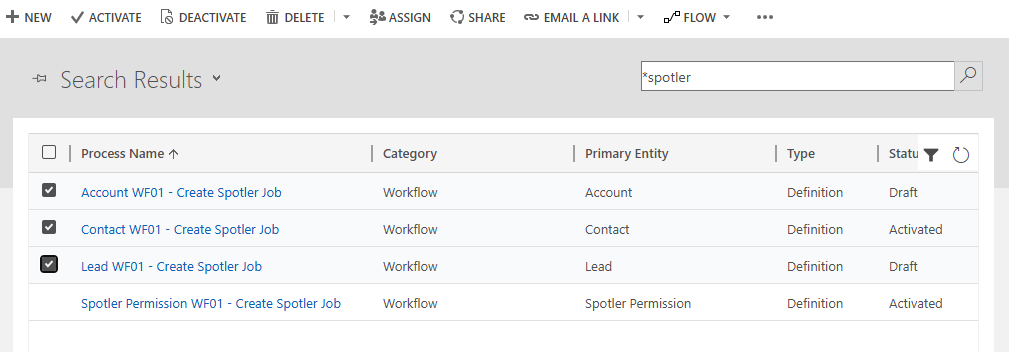
- `Account WF01 - Create Spotler Job`
- `Contact WF01 - Create Spotler Job`
- `Lead WF01 - Create Spotler Job`
- `Spotler Permissions WF01 - Create Spotler Job`
These Workflows can be tweaked to your liking, or even completely deactivated, if you wish to build the logic in another way, like [Power Automate](https://www.microsoft.com/en-us/power-platform/products/power-automate).
### View Workflows
1. Sign in to the Dynamics 365 environment (or in to [Power Apps](https://make.powerapps.com/)).
2. Select the **Settings** icon (⚙️) on the upper right, and then select **Advanced settings**.
3. In the left navigation bar (or the down arrow next to **Settings** on the top bar), select **Processes** under **Process Center**. Click on **Processes** to view the processes.
4. Change the view dropdown from **My Processes** to **All Processes**.
5. In the Search bar, type in __*spotler__ and press enter to find all the workflows related to the connector.
6. In the list of processes, select the workflow that you want to open, **Activate** or **Deactivate**.
### Activate / Deactivate (Draft)
You only need **Activate** the workflows for the type of **Table** that you want to synchronize to Spotler: **Account, Contact and/or Lead**.
In the [list of processes](#view-workflows), the column **Status** will tell if the Workflow is Active or not. You can change the status by selecting Workflow and then press **Activate** or **Deactivate** in the top command bar.
The workflow for **Spotler Permissions** should always be Active.
### Open Workflow
To open a Workflow go to the [list of processes](#view-workflows). Open the specific Workflow by clicking on the name of the Workflow.
The bottom part shows the Workflow steps. To view the Fields that trigger this Workflow, click on **View** next to the text **Record fields change**.
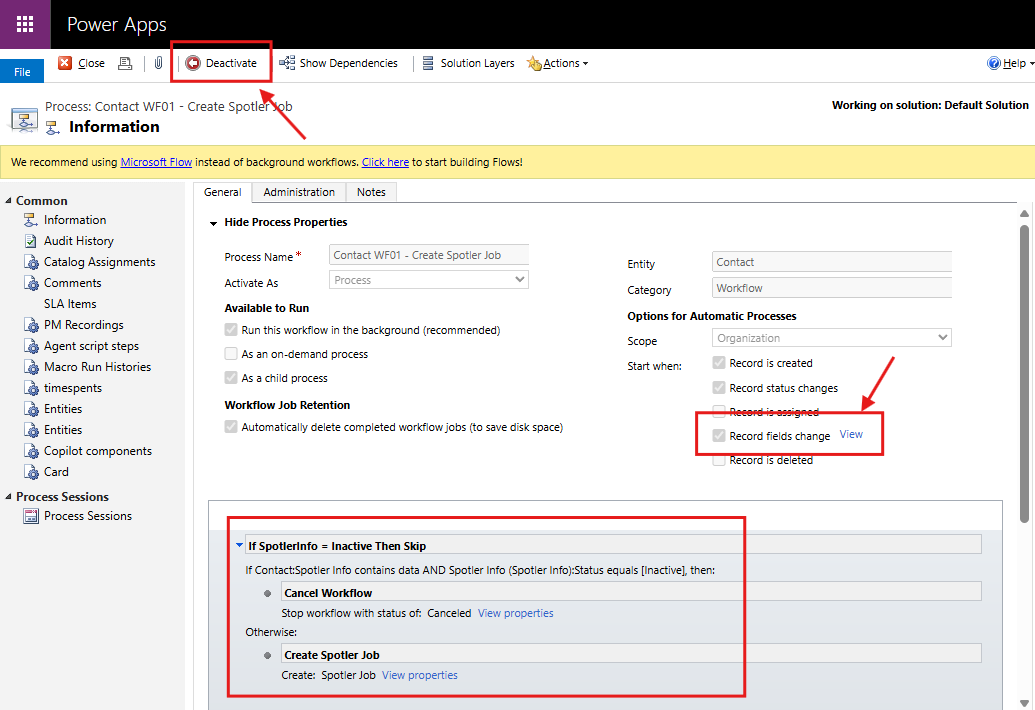
---
## Trigger Fields
Active Workflows only trigger for specific Fields that are changed. When a specific Field is changed, a _[Spotler Job](../25/spotler-jobs)_ will be created.
So, when the mapping is changed, you often want to update the specific Fields that triggers these workflows.
### Edit Fields
You can only edit a Workflow when it is in Draft (=Deactivated).
1. [Open the Workflow](#open-workflow).
2. Click on the **Deactivate** button in the top command bar and press **Deactivate** in the confirmation dialog.
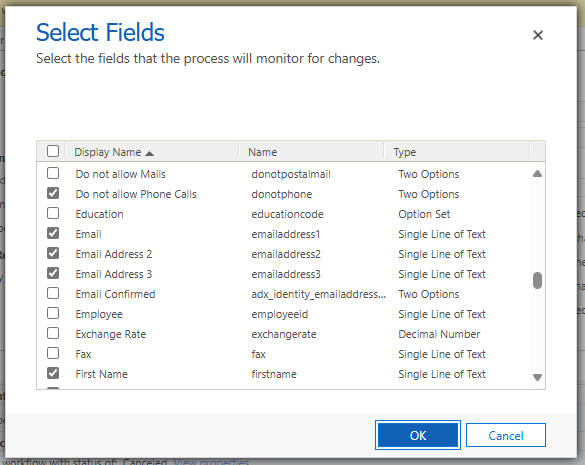
3. Click the button **Select** next to the text **Record fields change**.
4. Select the **Fields** you want to trigger the Workflow for.
5. Press **OK** when done.
6. Press **Activate** in the top command bar to save and activate the Workflow. Press **Activate** in the confirmation dialog.
# Customizations
_✍️ DRAFT : IN PROGRESS_
- [Auto populating Permissions for new Accounts/Contacts/Leads](#auto-populating-permissions-for-new-accountscontactsleads)
- [Populating Permissions for existing Accounts/Contacts/Leads](#populating-permissions-for-existing-accountscontactsleads)
- [Sync Contact Job or Marketing List](#sync-contact-job-or-marketing-list)
- [Manually adding Permissions by Admin](#manually-adding-permissions-by-admin)
- [TODO's](#todo-39-s)
---
## Auto populating Permissions for new Accounts/Contacts/Leads
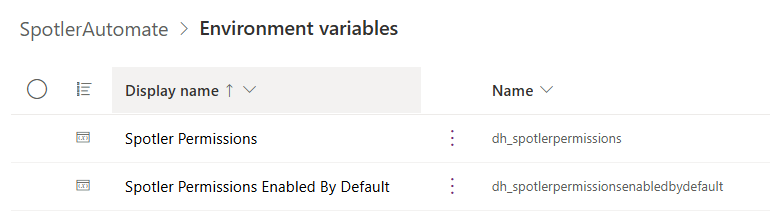
When a new Account, Contact or Lead is created in CRM a background process will create Spotler Permissions (1-2sec). Which Permissions will be created can be configured in two Environment Variables:
1. Spotler Permissions (dh_spotlerpermissions)
Holds a semicolon (;) separated string with the Permissions that will be created. The connector will keep this in sync with Spotler.
To disable the auto-creation of permissions add a Current Value with a semicolon (;).
2. Spotler Permissions Enabled By Default (dh_spotlerpermissionsenabledbydefault)
Holds a semicolon (;) separated string with the Permissions that will be Enabled (opt-in) by default. If you don't want to enable any permission then give it the value ;.
## Populating Permissions for existing Accounts/Contacts/Leads
After installation of the connector, Spotler Permissions are not automatically added to existing Accounts/Contacts/Leads.
### Sync Contact Job or Marketing List
The best way to populate the Permission for existing Accounts/Contacts/Leads is to synchronize them with Spotler. The connector will detect that there are no Permissions and create them, and if the contact already exists in Spotler with enabled Permission(s) will copy them.
This can be done by creating a SpotlerJob with Operation=Sync Contact, or create a MarketingList with the Accounts/Contacts/Leads and sync the list.
A down-side of this approach is that by default the Permission are opt-out!
### Manually adding Permissions by Admin
If you want to enable (opt-in) for one or more Permissions for existing Account/Contact/Lead, a better approach would be to create Spotler Permissions manually in CRM for each existing Account/Contact/Lead.
Only an Administrator has the rights to create Spotler Permissions.
The following columns need to be set to create a Spotler Permission:
- Customer: specify the Account or Contact
- or Lead: specify the Lead
- Name: the name of the Permission. Make sure this matches with what h is configurated in Spotler!
- Subscribed: Yes/No. Select Yes to opt-in for the Permission.
This can be done in bulk, for example by using Power Automate or other tools.
After creating Spotler Permissions in CRM, the existing Accounts/Contacts/Leads still need to be synchronized! Create a SpotlerJob with Operation=Sync contact, or create a MarketingList with the Accounts/Contacts/Leads and sync the list.
## TODO's
TODO: Describe options and advise for Dynamics 365 implementators/partners.
TODO Explain:
- Field to add to form:
- Spotler Info (Status) field
- Bulk Email field
- Subgrid Permissions
- Connection using Endpoint and how to edit this with Plugin Registration Tool
- Possible JavaScript
- Monitoring Dashboard
- Possible settings in connector
# Troubleshooting
- [Spotler Job stays on status 'Queued'](#spotler-job-stays-on-status-39-queued-39)
---
## Spotler Job stays on status 'Queued'
### Problem
Spotler Jobs have initial the status _'Queued'_. This status should change to _'In Progress'_ and end in the status '_Completed'_ (or _'Failed'_).
Often these status changes happen fast, but there can be a delay in processing. Normally most Spotler Jobs are processed within 3 hours.
If the status after a day is still _'Queued'_ there could be a problem in processing.
### Possible Cause
Go to the waiting Spotler Job and click on **Related > Background Processes**. Does it contain a failing **System Job**?
If there is a failing **System Job** then open it. Go to the **Details** tab, which contains the error message.
If the error message contains _'A SASKey has not been configured for ServiceEndpoint SpotlerAutomate'_ than the SAS Key is missing or not correct.
If there are no failing **System Jobs** than the connection to **AutomateValue Connector Platform** is working.
### Solution
- **SAS Key is missing or not correct**
Please re-enter the SAS Key for the SpotlerAutomate endpoint, using the **Plugin Registration Tool**. Contact AutomateValue to retrieve the SAS Key and/or to solve this issue together.
- **Connection is working**
Contact AutomateValue to check if the environment is enabled for syncing or to check for any other issues