Synchronize Contacts
Keeping your contacts up to date shouldn’t require manual exports or imports. That’s exactly what the Spotler Connector fixes — it keeps contact data in Dynamics 365 and Spotler synchronized automatically.
The Spotler Connector keeps your contact lists in sync between Dynamics 365 and Spotler. So when a customer updates their info in your CRM, it’s reflected in Spotler — and vice versa if you choose.
That means:
- No more CSV exports
- No more outdated email lists
- Always the right data for your marketing campaigns
The connector supports these record types in Dynamics 365:
- Contact (🇳🇱 Contactpersoon)
- Lead (🇳🇱 Potentiele Klant)
- Account

- 🔄 How Synchronization Works
- ➡️ Syncing from Dynamics 365 to Spotler
- ⬅️ Syncing from Spotler to Dynamics 365
- ⚙️ Field Mapping
🔄 How Synchronization Works
The Spotler Connector supports both one-way and two-way synchronization.
| Direction | Description |
|---|---|
| ➡️ Dynamics → Spotler | Default setup. Keeps Spotler updated with the latest CRM data. |
| ⬅️ Spotler → Dynamics | Optional. Use when contacts can update their info via Spotler forms. |
| 🔁 Two-way Sync | Keeps both systems aligned automatically. Useful when both systems can change data. |
By default:
- Contact info syncs from Dynamics 365 to Spotler (➡️ one-way).
- Subscriptions (Permissions) sync both ways (🔁).
If you have a profile update form in Spotler where customers change their name or email — enabling two-way sync ensures those updates flow back into Dynamics 365 too.
➡️ Syncing from Dynamics 365 to Spotler
The Spotler Connector automatically synchronizes new or updated Contacts, Leads, and Accounts from Dynamics 365 to Spotler.
As soon as a record is saved, the connector detects the change and starts synchronization — typically completing within seconds.
🕒 When Synchronization Runs
Synchronization is triggered automatically when:
- A record is created
- Contact details are edited and saved
- Do Not Email or Do Not Bulk Email is changed
- Subscriptions (Permissions) are changed
- The record’s status is activated or deactivated
- The record is deleted in Dynamics 365
If Do Not Email is set to true or a contact is deactivated or deleted, the connector anonymizes the record in Spotler. Contacts cannot be deleted in Spotler, but anonymization ensures that all personal data is removed.
💡Tip: Anonymizing when a contact is deactivated can be turned off. Support (support@automatevalue.com) can adjust this for you.
To change when the synchronization is run in Dynamics 365, see the more advanced section Configure Contact Sync
⚙️ What the Connector Checks
Before syncing, the connector validates that each record meets the required conditions:
- The record is active
- A valid email address is available
- Spotler Status is not Opt-Out
- The record is not excluded by any mapping filters
When those conditions are met:
- New records in Dynamics 365 are created as new contacts in Spotler
- Updates to existing records automatically refresh the contact’s information in Spotler
⏱️ Timing and Verification
Synchronization timing can vary slightly depending on network speed and overall system load, but updates typically appear in Spotler shortly after saving.
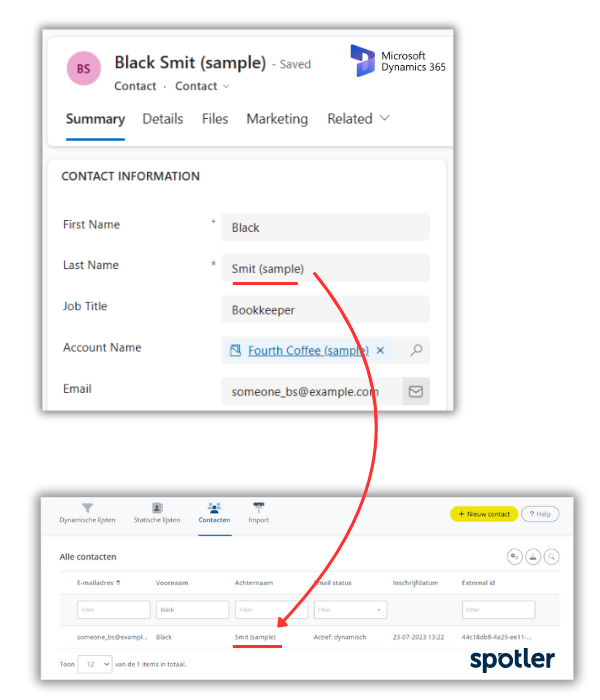
To verify that synchronization worked correctly, check Contacts in Spotler. The synced name, email, and mapped fields should match your Dynamics 365 record.
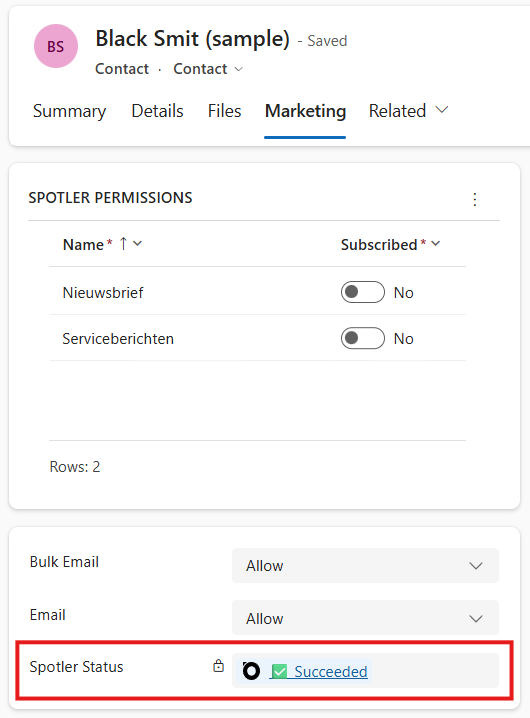
If a record doesn’t appear in Spotler, it likely didn’t meet one of the sync conditions — check the contact’s Spotler Status, which is often found on the Marketing tab. You can click the status for more details.
🔁 Duplicate prevention in Spotler
When contacts are synchronized from Dynamics 365, Spotler automatically applies its duplicate prevention rules. These rules ensure that the same contact will not be created twice.
Duplicate prevention in Spotler works by comparing both the externalId and the email address of incoming data. If a contact already exists with the same email address, Spotler will merge the new data with the existing record instead of creating a duplicate. This prevents multiple records for the same person and ensures that each contact receives only one newsletter or campaign message.
This means that you can safely synchronize contacts from Dynamics 365 without worrying about duplicates being created in Spotler.
💡Tip: It is not advised, but there is an option to add one or more fields to the duplication-prevention rules. Contact Spotler to adjust this.
⬅️ Syncing from Spotler to Dynamics 365
The Spotler Connector doesn’t just send data one way — it can also synchronize changes from Spotler back to Dynamics 365. This ensures that any updates made in Spotler (for example, through profile forms or automation actions) are reflected in your CRM.
Under normal conditions, the connector checks for changes in Spotler every 15 minutes. When updates are found, it evaluates the field mapping to determine which fields are set to:
- ⬅️ Sync from Spotler to Dynamics 365 (one-way)
- 🔁 Sync in both directions (two-way)
If a field is configured in either of these directions, the corresponding values in Dynamics 365 will be updated automatically. This applies even if the Spotler update originated from a previous sync from Dynamics 365 — ensuring both systems always remain consistent.
By default, Subscriptions (Permissions) are already configured for two-way synchronization, so any changes to a contact’s email permissions in Spotler are automatically reflected in Dynamics 365.
⚙️ Field Mapping
The Spotler Connector uses a field mapping to define which data is synchronized between Dynamics 365 and Spotler.
Each field in this mapping can have its own synchronization direction — so you can choose what makes sense for each specific field.
For example, you might:
- Sync First Name and Email only from Dynamics to Spotler (➡️)
- Sync Permission Status both ways (🔁)
- Sync Profile Updates like phone number back from Spotler (⬅️)
You can configure the direction per field:
- ➡️ Sync only to Spotler
- ⬅️ Sync only to Dynamics 365
- 🔁 Two-way sync
This flexibility lets you fine-tune synchronization to fit your data flow and business logic. Most data types are supported in both directions. If you need help customizing the field mapping, contact our Support (support@automatevalue.com) — we can adjust it for your setup.
By default, a simple initial mapping is included to get you started. It synchronizes basic contact information such as name, email, job title, birthdate, and address from Dynamics 365 to Spotler. This ensures your main contact details are immediately usable for campaigns, without needing any manual setup.
🧹 Purging existing properties
There is an advanced option to Purge Existing Properties When Not Set (PurgeExistingPropertiesWhenNotSet).
When enabled (true), any existing fields in Spotler that are not included in the update from Dynamics 365 will be cleared (purged).
This ensures that outdated or removed data is not kept in Spotler. This option is useful when you want Spotler to always reflect exactly what’s in Dynamics 365 — and not retain values that no longer exist in CRM.
By default, this setting is false, meaning existing values in Spotler remain unchanged if they are not explicitly updated. This is especially important if CRM is not the only source of information.
If you need help enabling or understanding this setting, contact Support (support@automatevalue.com) for guidance.